This feature allows the user to insert new or modify existing annotations in charts in both Word, PowerPoint and Excel. The user selects the chart concerned, and thus use the opened dialog to configure the annotations.
We have developed three commands for this feature: one that opens the dialog, one to reposition all shapes, and one to delete all shapes. These will be elaborated below.
How it works
This feature opens a dialog, where chart annotations can be added or modified. To use this feature, a chart must be selected. Here is an example:
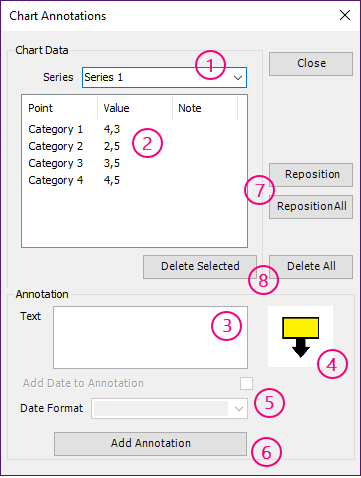
1) Select a series.
2) Select a point.
3) Type the text for the annotation.
4) Select where the annotation should be located according to the data point. Click to switch between top, bottom, left and right.
5) If the chart contains dates, the user is able to select which date format, and thus add it to the annotation.
6) Inserts the new annotation or modifies an existing depending on what is defined.
7) If the data in the chart has been changed, these buttons can be used to reposition the annotations. The user can either reposition a single annotation or all annotations in the chart. In this way, the user ensures that the annotations are pointing to the correct location.
8) The user is able to either delete the selected annotation or all custom shapes inserted in the chart (annotations, break points, average line, etc.).
CMDs
Command to open dialog:
<Cmd case="BaseExtensions:chart-annotations"/>
Command to reposition all:
<Cmd case="BaseExtensions:chart-annotations-reposition-all"/>
Command to delete all:
<Cmd case="BaseExtensions:chart-annotations-delete-all"/>
Expansion with date formats
Annotations for charts can be expanded with an extra set up. In this way, the presented options of date formats in the drop down will depend on the language coming from Templafy. This is handy if the client has users of several languages. For instance, the user can set up its profile to be English (UK) and open a template from Templafy. The template then contains a document property that contains the IANA language code en-GB which filters the options of date formats which is defined in a JSON file.
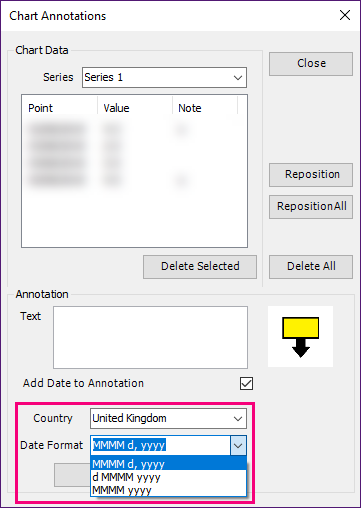
How to configure date formats
1) Extend the command to open dialog as follows:
<Cmd case="BaseExtensions:chart-annotations" DateFormatDocPropertyName="DocumentLanguage"/>In this parameter, we define the name of the document property that holds the IANA language code (coming from Templafy) as value.
2) Create a JSON file named DateFormats.json located in Content/BaseExtensions in the SDUP. In this file, we define each date format and language. The file can contain as many date formats as needed. Follow this structure:
[
  {
    "Language": "de-CH",
    "LanguageFriendlyName" : "Switzerland",
    "DateFormat": "d. MMMM yyyy"
  },
  {
    "Language": "en-AU",
    "LanguageFriendlyName" : "Australia",
    "DateFormat": "MMMM yyyy"
  }
]
The Language parameter is the IANA value, so if the value in the document property called "DocumentLanguage" matches a value in this parameter, only these date formats will be visible in the drop down in the dialog.
The LanguageFriendlyName parameter is to be customized but it makes sense to define the country as value, while the DateFormat parameter is the date format for the language concerned.
Was this article helpful?
That’s Great!
Thank you for your feedback
Sorry! We couldn't be helpful
Thank you for your feedback
Feedback sent
We appreciate your effort and will try to fix the article