Before getting started, read this article that describes ALang in general and when to use it. In this article, I will elaborate the functionality and describe the different elements when building a command. This includes both objects, operations and elements to control the flow.
Use the table below as shortcuts to jump to a specific section:
| Objects | Shape | Style | ||||||||
| Operations | Hide | Show | Color | Select | Name | Move | Height | Width | TextWrapping | BorderStyle |
| Control flow | ForEach | If | Break | Block |
There are various ways to use ALang, and some of these are explained in this article as examples of usage. I recommend to take a look at those to get an idea of how the many objects and operations in ALang can be used and how to build the module.
In solutions with a high amount of complexity, it can be handy to use an ExternalFunction. Read more about it in this article.
Objects
An object is simply some kind of item that we can target in an operation. There exist a lot of objects, and the diagram below illustrates how they are connected. The overall object is a document where both shapes and styles can be present as objects, and these have also several objects within:

Document
As mentioned, we are able to target both shapes and styles in a document. Thus, shapes and styles can be described as child elements where we can go deeper and target their child elements.
Shapes
When using Document.Shapes, we target shapes in the active document. The properties in shapes include name, visibility, fill, line and font:
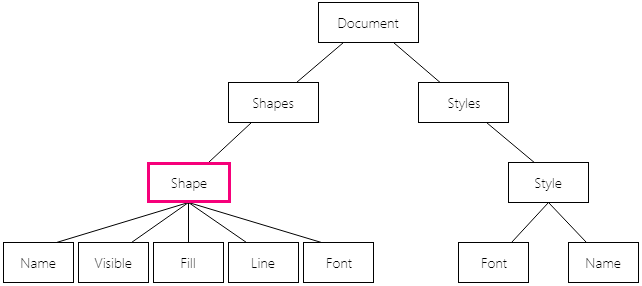
Shape
The operations in ALang can be used to do various actions with shapes, thus the shape as an object has several properties:
Name
We can target a shape by its name which is a string.
Visible
We can target a shape by its visibility. This can return either true or false.
Fill
We can target the fill of a shape. Here, we are able to control the color and its transparency and brightness, which is explained further in the operation Color.
Line
We can target the line of a shape. Just as in fill, we are able to control the color and its transparency and brightness.
Font
We can target the font in a shape. Here, we can control color and name of the font. This is explained further in the operations Name and Color.
Styles
When using Document.Styles, we target styles in the document. The properties in styles include font and name:
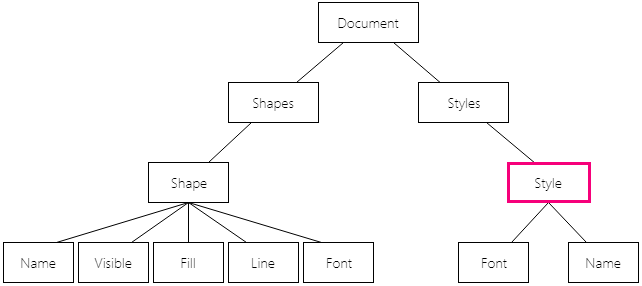
Style
Just as with shapes, the operations can be used do various actions with styles in the document. Styles can be targeted with either built in styles, e.g. Document.Styles[WdStyleHeading1] or with the name of the style, e.g. Document.Styles[ThisIsATest].
A style as an object has two properties:
Font
We can target the font in a certain style. Here, we can control color and name of the font. This is explained further in the operations Name and Color.
Name
We can target a style by its name.
Operations
As mentioned, we have operations to execute various actions. These can be seen as methods to do something with ALang and are described below.
Hide
This operation does only work on objects that have the Visible property. The operation hides whatever is targeted, thus there is one parameter:
target
Define the variable to apply to.
Example
In this example, all shapes with names that contain "Hello" will be hidden.
<ForEach name="Shape" source="Document.Shapes">
   <If source="Shape.Name" contains="Hello">
      <True>
         <Hide target="Shape"/>
      </True>
   </If>
</ForEach>
Read more about ForEach and If later in this article.
Show
This operation does only work on objects that have the Visible property. In contrast to the operation above, this parameter will show whatever is targeted.
target
Define the variable to apply to.
Example
This example will show all shapes that are hidden:
<ForEach name="Shape" source="Document.Shapes">
   <If source="Shape.Visible" equals="false">
      <True>
         <Show target="Shape"/>
      </True>
   </If>
</ForEach>
Read more about ForEach and If later in this article.
Color
This operation does only work on objects that have the Color property. The operation can set color of whatever is targeted and has several parameters:
target
Define the variable to apply to.
color
Colors can be defined with a RGB color code or with $variableName$.
accent
Colors can also be defined by referencing to a color scheme accent. The accent must be defined as one of the following or with $variableName$:
- accent1
- accent2
- accent3
- accent4
- accent5
- accent6
- light1
- light2
- dark1
- dark2
transparency
Define the transparency of the color or with $variableName$. 0.0 is opaque, while 1.0 is clear.
brightness
Define the brightness of the color or with $variableName$. -1.0 is black (darker), 0.0 is none and 1.0 is white (lighter).
Example
In this example, the font color of the specified style will be changed.
<Color target="Document.Styles[wdStyleHeading1].Font" color="255,0,0"/>
Select
This operation does only work on shapes. It simply selects the targeted one.
target
Define the variable to apply to.
If this operation is used in conjunction with the break element, which is described later in this article, and there are several shapes to target, it will select the first shape and then stop.
Example
Here is an example where the first visible shape will be selected.
<ForEach name="Shape" source="Document.Shapes">
   <If source="Shape.Visible" equals="true">
      <True>
         <Select target="Shape"/>
      </True>
   </If>
</ForEach>
Read more about ForEach and If later in this article.
Name
This operation does only work on objects that have the Name property. The operation sets the name of whatever is targeted.
target
Define the variable to apply to.
value
Define what value the name should be changed to. This can either be defined with a string value or with $variableName$.
Example
This will change the font of a specific style to Times New Roman.
<Name target="Document.Styles[Heading 1].Font" value="Times New Roman"/>
Move
This operation does only work on shapes. It can be used to move a shape both horizontally and vertically. All values in the following parameters can be string values or be defined with $variableName$.
horizontalAlignment
Move targeted shape due to horizontal alignment to either margin or page.
horizontalPosition
Move targeted shape due to horizontal position to either left, center or right.
horizontalOffset
Move targeted shape due to horizontal offset in points.
verticalAlignment
Move targeted shape due to vertical alignment to either margin or page.
verticalPosition
Move targeted shape due to vertical position to either top, center or bottom.
verticalOffset
Move targeted shape due to vertical offset in points.
Example
Here, all shapes with names that contain "Hello" will be moved with a vertically alignment to the page and a position in top of the page.
<ForEach name="Shape" source="Document.Shapes">
   <If source="Shape.Name" contains="Hello">
      <True>
         <Move
            target="Shape"
            verticalAlignment="page"
            verticalPosition="top"
         />
      </True>
   </If>
</ForEach>
Read more about ForEach and If later in this article.
Height
This operation does only work on shapes. The operation changes the shape size by setting the height of the object.
target
Define the variable to apply to.
value
Define the height value.
Example
In this example, the size of all shapes will be changed as the height is set to 222.28.
<ForEach name="Shape" source="Document.Shapes">
   <Height target="Shape" value="222.28"/>
</ForEach>
Read more about ForEach later in this article.
Width
Just like the operation above, this one does only work on shapes. Here, the operation changes the shape size by setting the width of the object.
target
Define the variable to apply to.
value
Define the width value.
Example
In this example, the size of all shapes will be changed as both the width and height are set to 222.28.
<ForEach name="Shape" source="Document.Shapes">
   <Width target="Shape" value="222.28"/>
   <Height target="Shape" value="222.28"/>
</ForEach>
Read more about ForEach later in this article.
TextWrapping
This operation does only work on shapes. It allows to set the text wrapping and distance from text in a shape, as in the native Word:
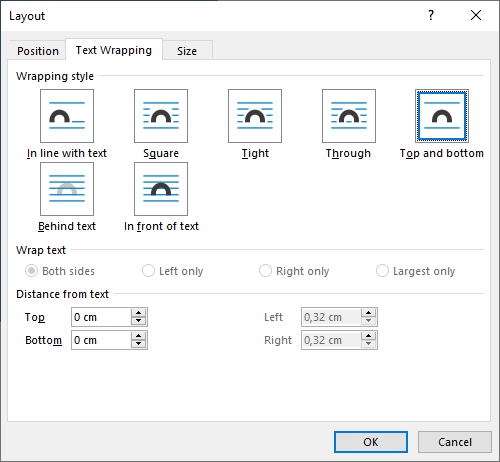
Note that the accessibility of both wrap text and distance depends on the type of wrapping style. Thus, we recommend to always set the wrapping style, if the parameters to set side and distance are used, in order to ensure that it is actually possible to set wrap text and distance from text.
target
Note that the actual element is called <TextWrapping/>, while the target is Shape.TextWrap.
The following parameters correspond to different text wrapping settings and are optional.
style
Define the wrapping style to apply to the shape concerned. We support the following options:
- InLine
- Square
- Tight
- Through
- TopBottom
- Behind
- InFront
side
Define the side of where the text should be wrapped. We support the following options:
- Both
- Left
- Right
- Largest
distanceTop
Define the distance to the text of the top using centimeters as a decimal number separated by ".".
distanceBottom
Define the distance to the text of the bottom using centimeters as a decimal number separated by ".".
distanceLeft
Define the distance to the text of the left using centimeters as a decimal number separated by ".".
distanceRight
Define the distance to the text of the right using centimeters as a decimal number separated by ".".
Example
<If source="Shape.Name" contains="_Move1_">
  <True>
    <TextWrapping
      target="Shape.TextWrap"
      style="Square"
      side="Both"
      distanceTop="0.5"
      distanceBottom="0.5"
      distanceLeft="0.5"
      distanceRight="0.5"
    />
  </True>
</If>
BorderStyle
This operation enables to control style borders, and thus it is possible to set border style and border color on styles. This is only supported in Word. We use this functionality to target the style concerned, and thereafter the border and then the type of border, like this:
"Document.Styles[NameOfStyle].Borders.TypeOfBorder"
There are three parameters for this operation.
target
Define which type of border that should be targeted using one of the following options:
- TopBorder
- BottomBorder
- RightBorder
- LeftBorder
Notice that you have to write Borders between the certain style and the specific border that you want to target, just as in the example above. This is just for future use in case the functionality is to be extended.
style
Define the style of the border with one of the following styles:
- Single
- Double
- Triple
- Dot
- DashLargeGap
- DashSmallGap
- None
Notice that some borders (like double and triple) are not possible to set in a width above 3 points. Other borders have a mixed limit of widths. Before configuring this, please check in Word what is actually possible to set on the specific border style.
width
Define the width of the border using one of the following options:
- Pt0_25
- Pt0_5
- Pt0_75
- Pt1
- Pt1_5
- Pt2_25
- Pt3
- Pt4_5
- Pt6
Example
As mentioned, we support changing both the color and border style on styles in Word. In order to apply a specific color, we use the Color operation. If the BorderStyle operation is used without the Color operation, the color will be set to the "Automatic" color. Obviously, the border on a style must exist before we can change the color.
<Cmd case="SkabelonDesign.ALang:execute">
    <BorderStyle target="Document.Styles[ThisIsAStyle].Borders.BottomBorder" style="Single"width="Pt1"/>
    <Color target="Document.Styles[ThisIsAStyle].Borders.BottomBorder" color="246,0,122"/>
</Cmd>
Control flow
We are able to control the flow when executing operations. They should not necessarily be included. Whether it makes sense to use the different elements will always depend on the scenario.
ForEach
This element works as a loop that checks each object in the collection. As an example, this can be used to go through each shape in a document. It has two parameters:
source
The source to whatever the element should go through. As an example, it will go through all shapes in the document if Document.Shapes is defined as source.
name
The name of the variable to define for each object, e.g. "Shape" if each object is a shape.
If
This can be used to execute the true branch (<True>...</True>) or false branch (<False>...</False>) based on the evaluation. This can be used both inside and outside the ForEach element. There are three parameters:
source
The variable to look for, e.g. Shape.Name.
contains
Define a string value or use $variableName$. This value can return either true or false. As an example, imaging that "_A" is defined as string value in this parameter, and the source is defined to search for the name of a shape. If it finds a shape with a name that contains "_A", the element returns true, and thereby execute the True branch.
equals
A string value that can return either true or false, or use $variableName$. Here, the string must be equal and not just be contained. If this parameter is used, but nothing is defined, it will match empty values.
length-min
Define a number that means the value must be longer than this number. As an example, if "1" is defined in this parameter, it matches all non-empty values.
Break
This element can only be used inside a ForEach. It will stop the ForEach and go back to the next statement.
Block
This element encapsulates a set of operations and ensures that everything inside will be executed. In an ExternalFunction, this makes sense to be used only as the surrounding element.
Comments
0 comments
Article is closed for comments.