Our advanced print feature enables the user to easily print documents from Word in different, customized ways. To get started with the implementation, the first step is to provide us with specifications for the print settings.
This article explains how to hand in the specifications to ensure swift implementation.
Where is the print feature implemented?
The print feature will be implemented in an additional tab in Microsoft Word along with other tools specific to your organization.
The functionality can be implemented both as a quick print (click once) via a button in ribbon or as a custom print via a user interface. Both will be implemented in a drop-down menu from where the user can select a print option.
Here is an example:
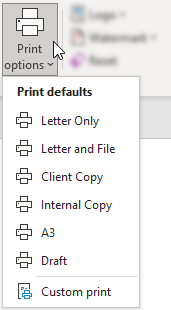
It is up to you to decide if you want both ways of printing, or if either the quick print options or the custom print interface alone will cover your needs. Just let us know!
How does it work?
For each print default, we have defined the print settings based on your specifications and needs. This allows the user to do a quick print of active document. The Custom print option will open a user interface from where the user can select a pre-set and then customize the print settings.
Here is an example:

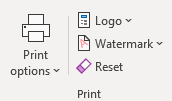
The advanced print feature allows to print twice with one click as well, e.g., print first with some settings and then print again with other settings. It can also be extended to toggle visibility of watermarks in the document upon print, meaning that a watermark should be inserted before printing and then be removed afterwards. Sometimes it also makes sense to show or hide logos in a document before printing.
In such cases, we will include features that enable the user to show/hide these elements:
Which specifications do we need from you?
In the bottom of this article you will find a specification sheet that should be used for specifying the different printer options you need.
Here, you must define what the name of the printer option should be (name in ribbon) followed by the settings. Add a row in the Excel sheet for each option there should be. Below table illustrates the settings and their supported definitions. Use this when filling out the sheet.
| Setting | What to define |
| Printer |
Name of printer. We support using "Default" to use the currently selected printer. |
| Duplex |
TRUE or FALSE. TRUE if it should print on both sides. Notice that defined printer should support duplex printing. |
| Print size |
We support the following options: A3 |
| Number of copies | Number of copies. Defaults to 1 if not defined. |
| Tray (for first page) | Name of tray where paper for the first page should be taken from. This must be a valid tray name. |
| Tray (for remaining pages) | Name of tray where paper for the remaining pages should be taken from. This must be a valid tray name. |
| Collate |
TRUE or FALSE. TRUE if it should keep each copy in a separate pile (when printing more than one copy). |
| Pages per sheet |
We support the following options: 1 |
| Print what |
We support the following options: Document |
| Watermark | Name of watermark. If it should not print with watermark, define NONE. |
Notice that the settings are present twice in the specification sheet. This is for defining if the particular print option should print twice. Settings for the first print is defined in column B-K, and settings for the second print is defined in column L-U. If the particular print option should just print once, then define NONE for column L-U in that row.
If you want to include watermarks, remember to hand them over as PNG files along with the specification sheet.
Questions?
If you have are in the process of defining the specifications for us and have any questions, please reach out to your contact in Omnidocs or use the form at omnidocs.com/support.
Comments
0 comments
Article is closed for comments.