Prefill forms automatically with captures
Introduction
In this tutorial, you will learn how Captures are used to prefill form fields when generating documents in Omnidocs Create Classic.
Captures are especially useful in scenarios where:
- An external system does not provide all required data
- You repeatedly have to enter the same information manually
Prerequisites
Before you begin, make sure that:
- You have access to Omnidocs Create Classic
- You can generate documents from at least one recipe
- The recipe contains form fields that have captures enabled
You do not need admin access to use captures.
What is a capture?
A Capture is a saved set of form values that you create while generating a document.
Once saved, a capture can be reused to prefill the form the next time you generate a document with those form fields. This helps you work faster and ensures consistency across documents.
Captures can be:
- Private, so only you can use them
- Public, so other users in the same Unit can reuse them
When should you use a capture?
Use captures when:
- You generate similar documents repeatedly
- You often enter the same information manually
Typical examples include:
- Sender or department details
- Reusable recipient information
- Standard project or case details
If a field is already filled automatically, a capture is usually not needed for that field unless you need to overwrite its contents.
Step 1: Generate a document and fill out the form
- Start generating a document in Omnidocs Create Classic.
- Select the desired recipe.
- Fill out the form fields that are not already prefilled.
Take a moment to review the information before continuing.
Step 2: Save the form data as a capture
Before generating the document:
- Open the "Captures" view.
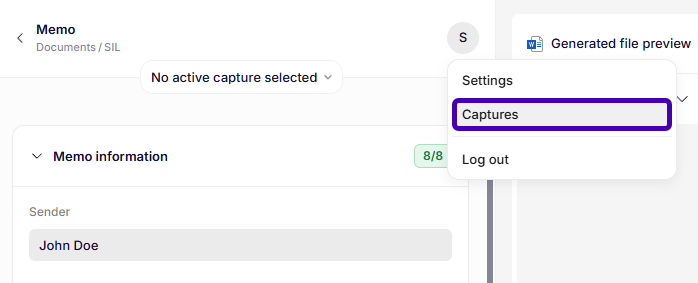
Opening the "Captures" view
- Create a new capture and give it a name.
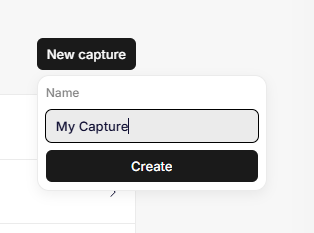
Creating a capture
- Navigate back to the form and select your new capture.
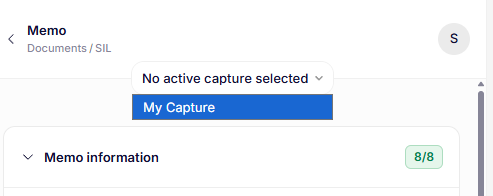
Selecting a capture
- Save the values of the relevant form fields.
When a value is saved in your capture, it will turn purple.
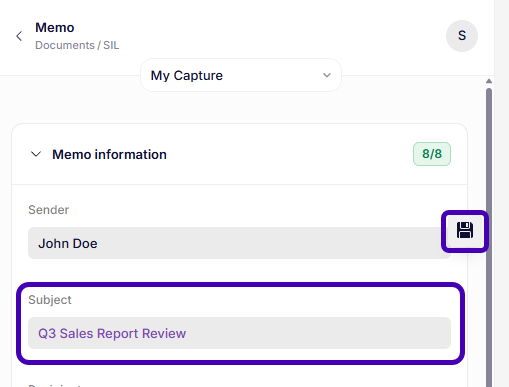
Adding values to a capture.
The entered values are now stored and can be reused later.
Step 3: Apply a capture to a new document
The next time you generate a document:
- Start the document generation flow as usual.
- Select your previously saved capture.
- Review the prefilled form fields.
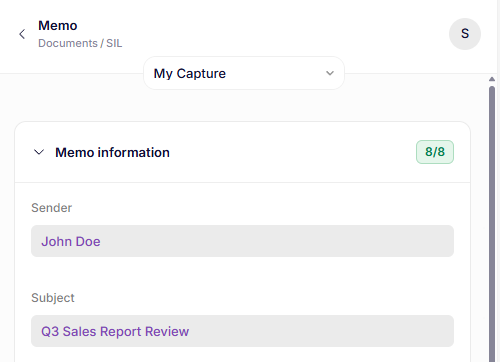
Prefilled form fields
Fields that match the capture are filled automatically.
Step 4: Generate the document
- Review the prefilled information.
- Make any necessary adjustments.
- Select Create Classic.
The document is now generated using the capture data.
Conclusion
Captures help you work faster by reusing previously entered form data when systems do not provide it automatically.
By saving and applying captures thoughtfully, you can reduce repetitive work and ensure consistent document creation.
Bonus information
It is possible to apply a capture as standard from the settings page.
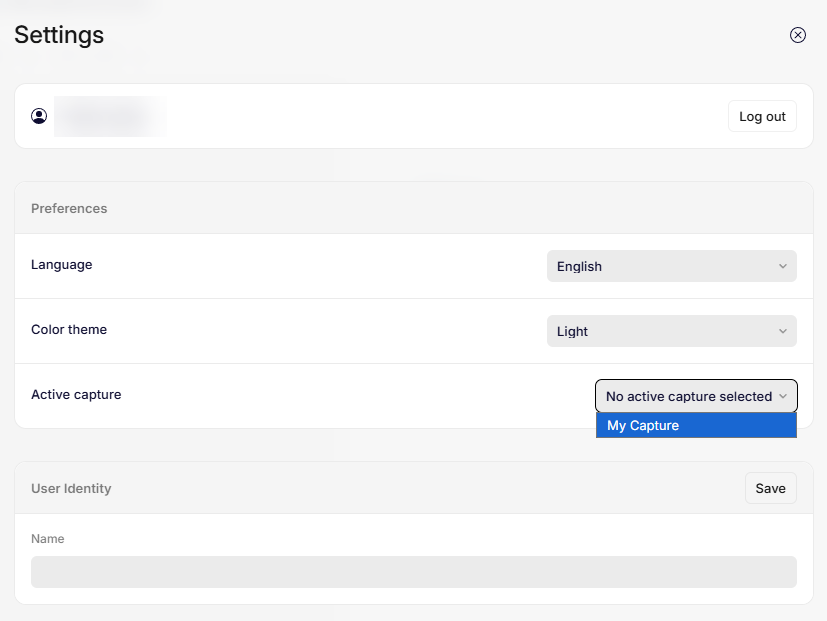
Selecting a standard capture
Was this article helpful?
That’s Great!
Thank you for your feedback
Sorry! We couldn't be helpful
Thank you for your feedback
Feedback sent
We appreciate your effort and will try to fix the article