Background
EU Directive 2018 (EN 301 549)
The EU’s directive, "Accessibility of public websites and mobile applications " (commonly referred to as the web directive) came into force on 23. September 2018 and dictates that all documents that are uploaded onto public sector websites must be accessible to people with disabilities.
The directive requires that documents, including PDFs are tagged correctly, such that screen readers can find and access necessary information about the content as described in W3C’s Web Content Accessibility Guidelines (WCAG 2.1). This covers descriptive text for images, logos, and other graphics, as well as tables, links, etc.
The Equality Act 2010
With the introduction of the Equality Act in 2010, the UK law “prohibits discrimination by providers of services, goods and facilities”. While this does not specifically mention websites, it is considered that "provision of a service" applies to commercial web services as much as to traditional services.
How to use Assist Pro
Assist Pro is a tool for Microsoft Word, Excel, and PowerPoint, that simplifies tagging documents for accessibility before they are converted to PDF. The tool identifies and makes it easy for the user to tag the following areas for accessibility:
- Titles
- Headings
- Tables
- Illustrations
- Links
- Objects
- Colours and contrasts
- Hidden content
As you finish working on a document, it is time to make sure that everything is accessible before you convert to PDF or send out the document. The following guide will help you get started using Assist Pro and tag your document for accessibility.
- On the ribbon in Office, select the Assist Pro tab.
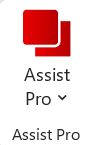
- Select the Assist Pro icon, this will open a side panel.
- Assist Pro will check your document’s body text, page header and footer and provide a list of what is missing and show you how to resolve the issues.
- If you make changes to the document, make sure to click the refresh icon at the top of the panel.
Understanding icons in Assist Pro
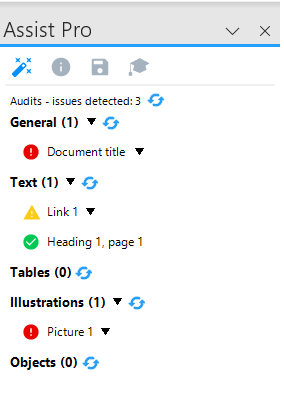
For each of the content elements, an icon indicates whether issues have been found:
- A red circle with an exclamation point indicates that a user needs to fix something.
- A green circle with a tick indicates that all elements of that type of content are populated correctly.
- A yellow triangle with an exclamation point indicates that content exists, but it should be verified by the user .
Navigating the categories
Assist Pro categorises the accessibility issues in 7 distinct categories to ease the process of making your documents accessible.
Document title
All documents must have a title in Word, Excel, and PowerPoint . A document title is not the same as the filename.
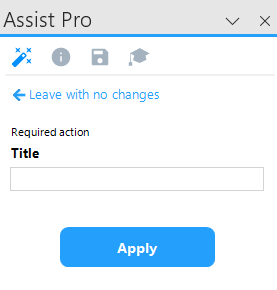
The title is necessary for a screen reader to tell the user which document they are accessing.
Under ‘General’, choose Document title by clicking the little black arrow. You can also right click or double click it. Choose “Add title” to enter the panel. Enter the document title and save it by clicking Apply .
Try to be precise when naming your document and avoid using unnecessary symbols.
For PowerPoint , please note that all slides must have a presentation title.
Styles
‘Styles’ lists all the heading styles used in the document and checks whether they appear in the expected order.
There must always be a Heading 1 style present in the document. Heading 1 must appear before any other heading.
Any following heading styles must appear in a logical order. For example, Heading 3 cannot appear if Heading 2 has not been used before it.
To apply a Heading 1 :
- Find the heading, this can be a title or headline, and tag it.
- Choose Home in the ribbon and go to the Styles-selector.
- Choose Heading 1.

Any following heading styles must appear in a logical order. You repeat steps 1-3 for any subheadings in your documents. Be advised that headings can only increase one level at a time, e.g. from Heading 2 to Heading 3 .
When you choose a heading in the Assist Pro panel, Word will automatically open the Navigation-pane. In this pane, you can see the current structure of your document based on headings. You can easily change the order of heading by dragging them in the navigation pane.
You can always decrease heading levels by one or several headings at a time. E.g going from Heading 5 to Heading 3 or Heading 2 is allowed.
Heading 1 is exempt from heading hierarchy and can be inserted anywhere.
Empty paragraphs (Optional)
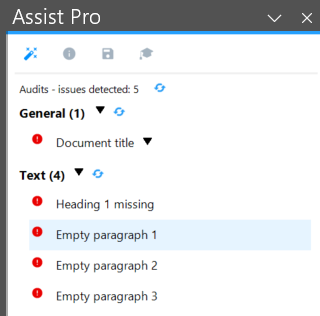
If enabled, Assist Pro will check the document for empty paragraphs. These can be shown as either Warnings or Errors, depending on the configuration. In case Assist Pro finds empty paragraphs in the document, they will appear in the ‘Text’-section of the side pane, as seen in the illustration to the right. To fix the issue, select the paragraph in the side pane and press ‘Delete’ on your keyboard. Repeat this process until all the issues have been resolved.
Tables
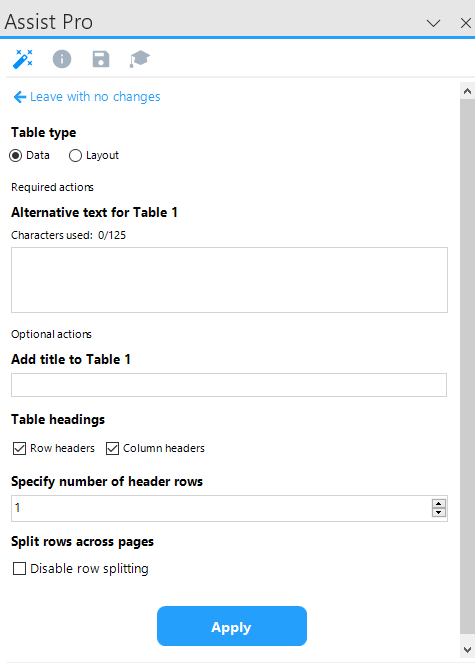
Tables can easily be made accessible to screen readers if you put effort into keeping the structures relatively simple and tag them correctly from the start with things like headings and alternative texts.
First of all, you should decide whether the table is a layout table (decorative), or if it contains meaningful data and therefore is a data table. This is the first step. Layout tables do not need any tagging and the process stops here, for data tables there are a few more steps to undertake.
If your table is a data table, you should avoid merged cells, as screen readers cannot effectively reproduce their content in a meaningful way.
In addition, you must ensure that each data table contains at least an alternative text that describes the content of the table. Best practice is to stay below 125 characters, which Assist Pro automatically counts.
You should also consider whether there should be table headings and whether a row of tables should be allowed to break across pages. If Assist Pro finds a table that breaks across pages, it will detect it as an error, as this causes misconception of data in a screen reader.
- Choose the table in the Assist Pro panel by double-clicking it.
- Choose the table type (design or layout)
- Write an alternative text for the table and its contents (data table).
- Add a title (optional).
- Assign the number of heading rows to be repeated across pages (optional, data table)
- Choose whether or not the table can break across pages (optional, data table)
- Save your changes by clicking Apply. If enabled in the Assist Pro configuration, row headers and/or column headers in the “Table headings” section will be mandatory instead of optional.
Illustrations
Illustrations require alternative text, but titles for illustration are optional.
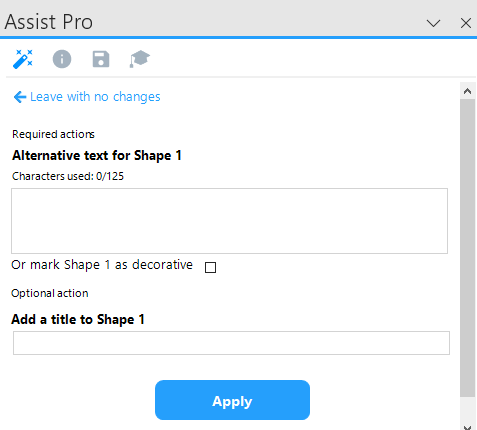
- Choose an illustration in the Assist Pro panel by double-clicking,
right-clicking it, or clicking the small arrow. 2. Write an image description. Make sure it is detailed enough to provide useful information. 3. If the image is purely decorative and adds no real information, tag it as Decorative (Optional). 4. Add a title (Optional). 5. Click Apply.
A good image description is written, by considering the information of the image and transferring it into the description. Pay attention to details that are important for understanding the image.
If in doubt, think about what you would write with text, if you could not use an illustration.
Note: Office 365 will auto-generate an image description, but it is advisable to delete this and write a description on your own. Assist Pro will remind the user of this by displaying a yellow triangle with an exclamation point .
Infographics
Be mindful of infographics. When describing an infographic, you must supply all the same information that the infographic supplies, alternatively consider combining your infographic with the same information in a plain-text format when publishing to avoid accessibility barrier.
Links
Links must be given a text to display, an address and a screen tip.
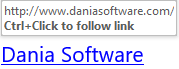
- Text to display: Text to display, is the visible text in the document. This is the text that is usually blue and underlined in most places to visualize that it is a hyperlink. Assist Pro gives a warning if no descriptive text has been entered.
- Address: the address is the link itself, usually starting with https://.
- Screentip: A screentip is the text that shows up when you hover your cursor on the text to display or on the link address. When writing a screentip, consider how it will be received and the context it is placed in. Be precise about where the link is going to take the user. Usually, screen readers do not display screentips.
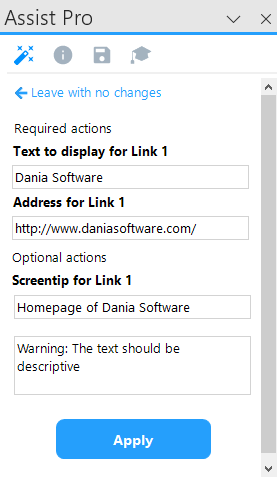
The ‘Text to display’ field will always have a standard text for links. If the link points to a location within the document, then it will not be possible to alter this text. If the link is external , then the display text can be edited – be aware that changes will show up in the document itself as the visible text.
- Choose a link to tag.
- Verify or add Text to display.
- Add a Screentip (Optional).
- Save your changes by clicking Apply.
Objects
This category covers several different types of elements, such as PDF, Excel worksheets or PowerPoint slides, but objects are tagged in the same way as Illustrations.
- Double-click the object in the Assist panel.
- Write an object description. Make sure it is detailed enough to provide useful information.
- Add a title (Optional).
- Click Apply to save.
Contrast Colours
‘Contrast check’ checks the text for proper contrasts between text and document-background. This is done to verify that the text is readable for everyone.
To enable the Contrast check function, click on Contrast check in the Assist Pro ribbon.
- Error – the contrast satisfies neither WCAG AAA nor AA requirements.
If the colour is not approved, you will need to change the text colour to something with a stronger contrast. Black on white will always be approved, due to the high contrast ratio. Consider this when choosing colours.
Approved colours will not show up in the side panel.
Hide changes
Assist pro will alert you that there may be hidden changes to your document, such as Track Changes may be turned on or comments may still be visible.
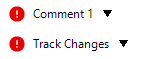
Comments and track changes will appear under general in the Assist Pro-panel.
If you have already turned off Track Changes and removed comments, they will not appear in the Assist Pro-panel.
Finishing your document
Once you are done writing your document and have filled out all the boxes in Assist Pro, make sure to hit the refresh -button one last time in case you missed something or added new illustrations, objects, links etc, that was not visible the first time.
Save as PDF
It is possible to save the document as a PDF when you have finished reviewing all the categories. When saved as a PDF, the document title will be suggested as the name of the PDF file.
The document can be stamped as PDF / UA when exported, based on the configuration in the apps-portal.
Save as HTML
It is also possible to save the document as HTML when you have finished going through the categories.
As when saving as PDF, the document title will be suggested as the name of the HTML-file.
Before you can apply this function, it must be activated in the apps-portal.
Further considerations
Fulfilling the necessary steps to create an accessible document is only the first steps, to a digitally inclusive future. There are many more areas that you can improve upon and take into consideration to create documents more easily accessible for everyone.
Language
One of the areas worth taking into consideration for your next document is the way you use language. Is it heavily abbreviated? Do you use excessively complicated sentences or words that are more ornamental than informative? Read your own text and consider if the language is easily understandable.
Abbreviations
Try to avoid using excessive amounts of abbreviations. Abbreviating words that may seems obvious to you, can be unfamiliar to the receiver of your document. Only abbreviate words if you make sure to write out the entire unabbreviated word or sentence at least once in the document to clarify the meaning of the abbreviation.
Unusual words
Most places of work use jargon or idioms, that may seem easily understandable to you due to the familiarity. Try to consider the jargon you use in documents and limit the jargon that may not be understandable to a third-party receiver.
Reading level
Long winding sentences can sometimes feel necessary to get a point across on text. However, long sentences can be difficult to read and understand, especially for someone with reading difficulty.
Try to keep your sentences short and easily understandable when possible.
Fonts, bold text, and fine print
Consider the choice of font and text size. Is it easily readable with low- or impaired-vision? Small text size or curly or serif-heavy fonts can be difficult to read and not all devices can scale text up. Make sure your document is written in a text that is readable for as many people as possible.
Images of text
Images of text does not translate into a screen reader. You can write out the image text in an image description (See 2.2.5) but try to avoid images of text if text alone can have the same effect.
Accessibility automation
Using template solutions that are pre-made with accessibility in mind is an excellent way to get through accessibility workloads quickly and easily.
DynamicTemplate can be used to create templates that are already tagged for accessibility, creating efficient documents that can be completed without extra work.
Was this article helpful?
That’s Great!
Thank you for your feedback
Sorry! We couldn't be helpful
Thank you for your feedback
Feedback sent
We appreciate your effort and will try to fix the article