2.1. General functions
Figure 2 below shows the common buttons that are displayed in the menu for all included Office programs. One exception to this is the ‘Send as PDF’, which only appears in Word, Excel and PowerPoint (see section 2.1.6. Send as PDF ).

Figure 2
2.1.1. Templates

Figure 3
Clicking the ‘Templates’ button, in the DynamicTemplate menu, causes the following dialog box to appear:
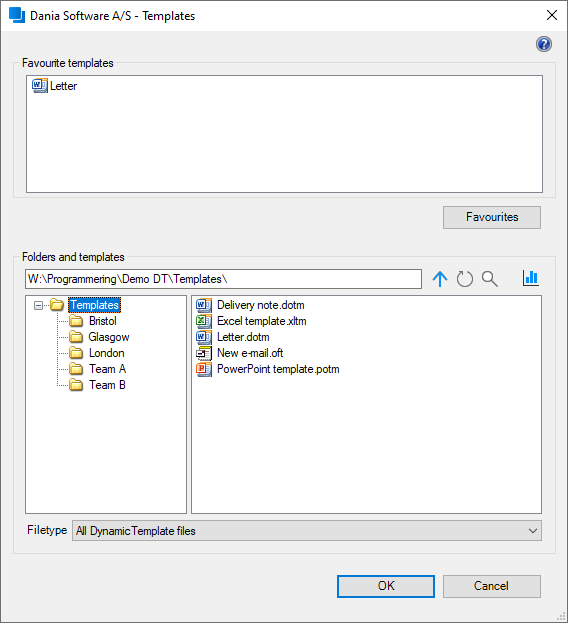
Figure 4
Figure 4 shows the dialog box that allows users to find and open templates. The ‘Folders and templates’ pane is used to navigate to, and open, the desired template. Alternatively, the ‘Favourite templates’ pane displays the most frequently used templates directly.
In the dialog box it is possible to expand/diminish the folder structure display or templates by dragging the separator between the two areas as illustrated below.
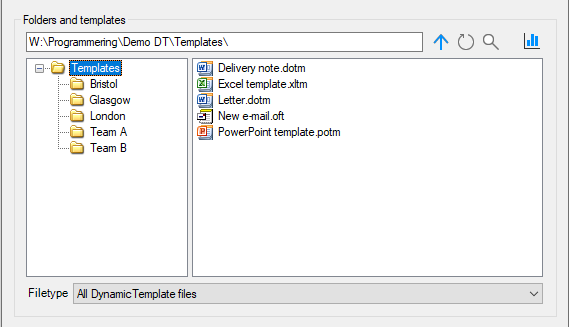
Figure 5
Note that templates can be opened from any Office program. For example, if a user is working in Word and opens a PowerPoint template (without PowerPoint being open in advance) then DynamicTemplate will start up PowerPoint and then open the template.
Clicking the ‘Refresh’ button , refreshes the information relating to the folder content and structure in the navigation pane. This is useful if, for example, a user creates a new subfolder while the dialog box is open; clicking refresh will make the new folder show up in the directory. This button is found in several dialog boxes and operates in the same way and it is therefore not described again.
The search function allows you to search for templates and folders in the entire template library. The search field is brought up with the ‘Search’ button or the keyboard shortcut CTRL+B and part of the template or folder name you are looking for is entered.
Depending on the settings, the search results are displayed either automatically, or the user must start the search by pressing ENTER or the icon in the search field ( 3.1.9.16 Settings for Templates and Standard Content search ).
The search results show all found templates and folders and their location. It is possible to sort by name and path by pressing the column header.
Templates and folders are inserted as usual from the search result and opened by double- clicking them.
To return to the regular file overview, you can use the ‘Search’-icon, CTRL+B, or Escape to hide the search results again.
The button ’Statistics’ is part of the Statistics module, which is an add-on to DynamicTemplate. Find further information here 3.8. Statistics Module (add-on) .
‘Filetype’ is a drop-down menu, which allows users to choose between the following five options governing which file types to display in the navigation pane:
- All DynamicTemplate files
- All Word templates – (*.dot, *.dotx, *.dotm)
- All Excel templates – (*.xlt, *.xltx, *.xltm)
- All PowerPoint templates – (*.pot, *.potx, *.potm)
- All Outlook templates – (*.oft)
‘All DynamicTemplate files’ will limit the displayed files to display all valid file types, i.e. all listed Word, Excel, PowerPoint and Outlook templates.
2.1.1.1. Comments on security
When a Word document is created by using the button "Templates" in the DynamicTemplate menu line, the template folder is added to the list of trusted locations to enable using the necessary macros in the templates.
Moreover, it enables network paths to be added to the list of trusted locations. These authorisations are not automatically removed from the list when DynamicTemplate is uninstalled. The list of trusted locations may be maintained through Trust Center under Word settings.
2.1.1.2. Favourite templates
In ’Favourite templates’ (Figure 4) the user can create a shortcut to often used templates.
It is easy to create a shortcut by right-clicking the desired template under “Folders and templates” and selecting “Add to favourites”. The shortcut is removed from the list by right- clicking it under “Favourite templates” and selecting “Remove from favourites”.
The list can be edited by clicking the ‘Favourites’ button shown in Figure 4, and using the new dialog box that appears as a result:
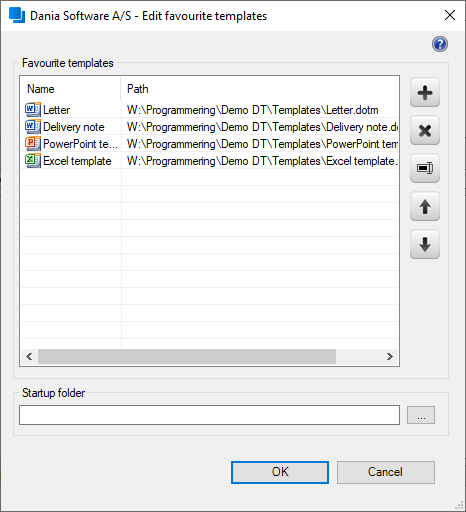
Figure 6
To add a new shortcut, you click the ’Add’ button , select the desired template and click ‘OK’ to accept. Now the following dialog box is brought up:
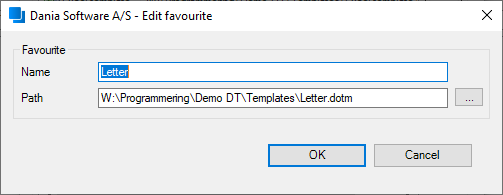
Figure 7
The dialog box is prefilled with the path to the selected template and the shortcut name that will be shown in ‘Favourite templates’ (Figure 4). Both fields can be edited before the shortcut is saved by clicking ‘OK’.
A shortcut is removed by selecting the template in the list and clicking the ’Delete’ button .
To edit a selected shortcut use the ’Edit’ button , which will bring up a dialog box from Figure 7, where it is possible to change the name or the path of the shortcut.
The order of the shortcuts in the list is adjusted by the buttons ’Move up’ and ’Move down’.
2.1.1.3. Startup folder
The ‘Favourite templates’ dialog box (Figure 6) also allows a different ‘Startup folder’ to be selected. The ‘Startup folder’ is the root folder that is used for navigating to templates within DynamicTemplate.
Clicking browse next to the ‘Startup folder’ field brings up the following dialog box:
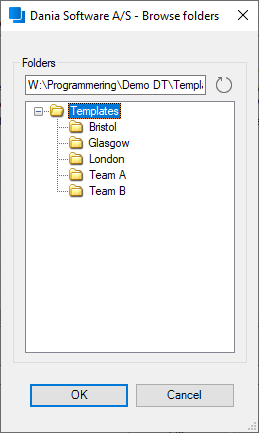
Figure 8
The dialog box shown in Figure 8 can be used to navigate to the folder that should now be used as the root folder for template navigation. Select the desired folder and click ‘OK.
Note that it is not possible to select a start folder if this is managed centrally ( 2.1.4 Joint user settings ).
2.1.2. DynamicTemplate Cloud (available separately)
Omnidocs offers the separate module DynamicTemplate Cloud, which gives users access to DynamicTemplate Cloud templates in Microsoft 365 and Microsoft Teams, without local installation of DynamicTemplate.
Note that the function requires that it is possible to communicate with the cloud service, cf. section 4. System prerequisites.
Contact Omnidocs for further information about DynamicTemplate Cloud.
2.1.2.1. DynamicTemplate Cloud templates
DynamicTemplate Cloud templates are managed through the portal at the address http://portal.daniasoftware.com.
To use the portal, you must have the necessary rights assigned to you by a Microsoft 365 Azure administrator.
Access the portal by logging on with a Microsoft 365 account. You will then see a dialog box where you can access the existing DynamicTemplate Cloud templates.
2.1.2.2. Creating DynamicTemplate Cloud templates
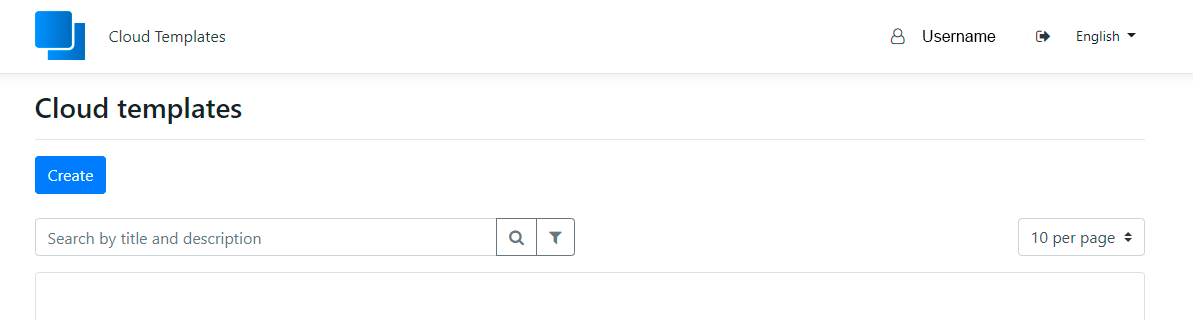
Figure 9
Clicking the “Create” button opens a new dialog box which lets you create new templates. The same dialog box appears if you select an existing DynamicTemplate Cloud template for editing.
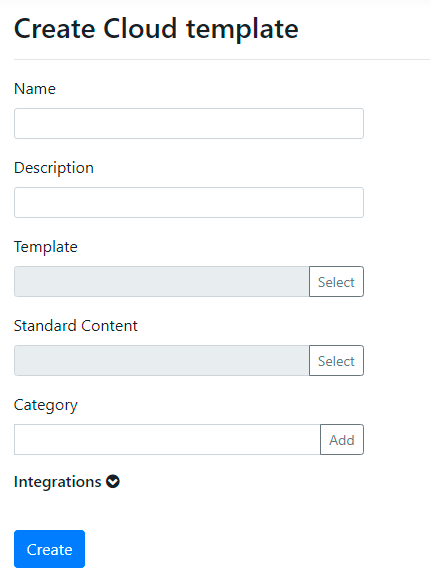
Figure 10
The dialog box is divided into the following sections when you create a new DynamicTemplate
Cloud template from an existing on-premise template:
- Name: The DynamicTemplate Cloud template name that will appear when the template is used.
- Description: Access and edit the template description.
- Template: Select the template that will form the basis for the new DynamicTemplate Cloud template. The template you choose will be synchronised from the DynamicTemplate on-premise directory.
Note: Normally, templates with dialog boxes must be marked by Omnidocs, however, templates without dialog boxes can be synchronized directly, but must contain the bookmark bmkStart, in order to be used with Standard Content. - Standard Content: Select Standard Content that is automatically inserted together with the template. You can choose from the Standard Content in the DynamicTemplate on-premise directory.
- Category: Add a category for the new template. The category is then used to select and display the template when starting from an EDRMS or line-of-business system.
- Integration: Select which EDRMS or line-of-business system the template will be used with.
2.1.2.3. DynamicTemplate Cloud in Microsoft 365 online
DynamicTemplate Cloud templates and Standard Content can be used from the online version of Microsoft 365 (Word online) by activating the DynamicTemplate menu in the top bar in your browser when using Microsoft 365 online.
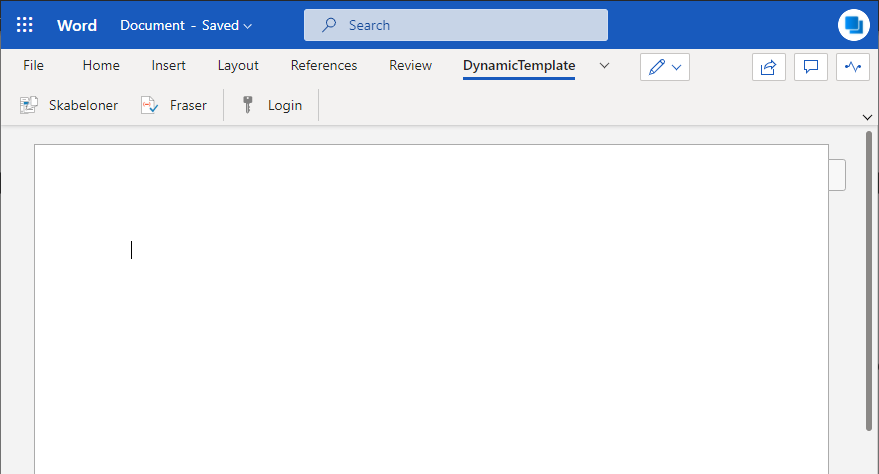
Figure 11
In the DynamicTemplate menu, it is possible to choose a template using the “Templates” button in the same way you insert Standard Content using the “Standard Content” button.
Note that certain prerequisites apply for the use of the solution, cf. section 4 System prerequisites.
2.1.2.4. DynamicTemplate Cloud in Microsoft Teams
When DynamicTemplate Cloud is to be used from Microsoft Teams, the Teams administrator can activate the solution for the relevant teams.
When the solution is activated, DynamicTemplate appears in the menu, where the DynamicTemplate Cloud templates can be accessed.
The documents created are saved automatically in the team under “Files”.
2.1.3. OneClick templates
A OneClick template can be set up by the Standard Content administrators and contains an indication of which design template to use and which Standard Content or ComboBlock to insert in the finished communication.
When the OneClick template is set up, it contains a path for the specified design template and Standard Content.
This means that changes in the design templates, Standard Content, and ComboBlocks will catch on in all OneClick templates.
2.1.3.1. Setting up OneClick templates
Standard Content administrators may set up OneClick templates by way of one button in the menu line in Word under “DynamicTemplate”, as illustrated in Figure 12.

Figure 12
By activating the “OneClick Template” button, the dialog box for setting up OneClick templates shows as illustrated in Figure 13.
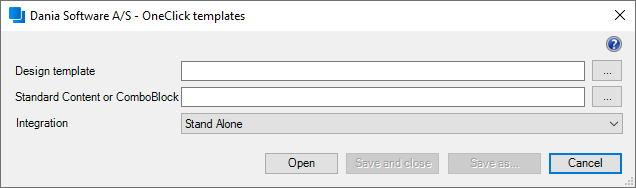
Figure 13
You need to select a design template.
It is optional to select Standard Content or a ComboBlock.
Integration may either be “Stand Alone” (no integration) or a supported integration which is covered by the customer’s license agreement.
The design template and Standard Content may be nominated by way of the ‘...’ buttons or manually by entering file paths in the fields.
It is a condition that the selected files exist and are available.
The buttons “Save and close” and “Save as...” will become active when a design template is selected. When activating one of these buttons, a dialog box appears where you may save the OneClick template.
When activating “Save and close”, the user will be prompted to specify where to save the OneClick template and the dialog box for setting up OneClick templates will be closed.
When activating “Save as”, the user will also be prompted to specify where the OneClick template is to be saved and the dialog box for setting up OneClick templates will remain open. This makes it easier to set up several successive OneClick templates.
The button “Open” may be used for loading the values from an existing OneClick template. When activating the button, the user will be prompted to select the OneClick template and the fields “Design template”, “Standard Content or ComboBlock” and “Integration” are filled in with the values from the selected template.
If you wish to change the selected OneClick template, the values may be changed, and the template be overwritten by way of the “Save and close” or “Save as...” buttons.
Overwriting existing files requires confirmation.
OneClick templates set up for “Stand Alone” use are saved as Word templates (.dotx).
2.1.3.2. Mode of Operation
When a OneClick template is opened in Word, the specified design template is automatically loaded and a dialog box for specifying receiver information, sender information, etc. is shown if needed.
Afterwards, the selected Standard Content or ComboBlock is automatically inserted.
If the Standard Content contains fields, the dialog box for specifying the value of these fields will show, and the finished document will be ready for use.
Please pay attention to the fact that the ’Normal.dotm’ template on the present computer cannot contain macros as they may interrupt the document creation when using the OneClick template.
2.1.4. Joint user settings
Besides the user’s own choices, the following settings can be set up centrally and automatically distributed to the users:
- Joint favourite templates
- Joint favourite Standard Content
- Predetermined start folder for templates
- Predetermined start folder for Standard Content
These main settings may be set up as area specific by installing the solution with different installation parameters for the individual areas as described under 3.1.8 Joint user settings (CompanySettings)
2.1.4.1. Start folder
If a centrally defined start folder has been configured, the dialog boxes for templates and Standard Content will start the navigation in this folder.
If the configuration allows the user to override this, the start folder can be set in the usual way under ‘Favourites’.
If the start folder is locked, the option for the user to select a start folder himself/herself will be inactive as illustrated below.
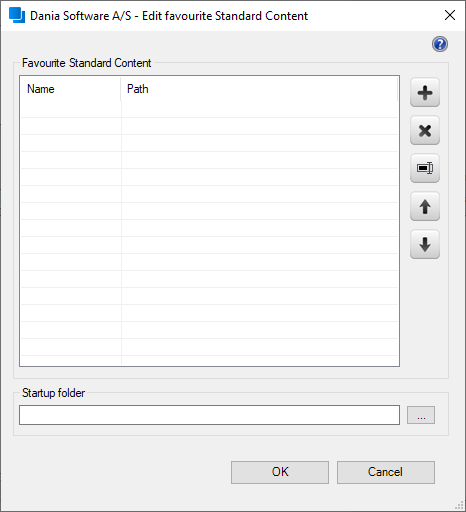
Figure 14
2.1.4.2. Favourites
If joint favourites have been configured, an extra window will appear as a supplement to the user’s own favourites in the dialog box which shows these joint favourites:
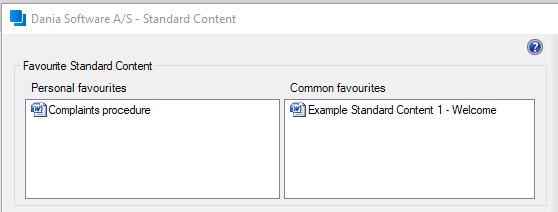
Figure 15
The use of joint favourites works the same way as one’s own favourites.
2.1.5. Users

Figure 16
Clicking the ’Users’ button shown in Figure 16 brings up the following dialog box:
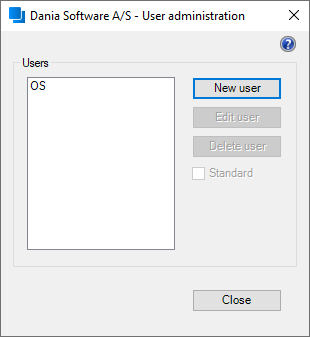
Figure 17
The locally accessible user profiles show up in a list in this dialog box. These include user profiles created automatically and manually.
When an Office program starts up (described in 1.1. Introduction to DynamicTemplate ) a profile is automatically created for the active user. The relevant details are read out from Active Directory. Figure 17 shows one profile, ’OS’, which is the automatically generated user profile for the actual user in this example.
Additional user profiles may be created to attach the relevant sender details in different documents, for example using different logos, different signatures etc.
Starting in version 2.5.001, it is possible to select a user profile to use as the default for template generation by marking the profile and ticking ‘Standard’. If no profile is selected, the template default is used, which is typically the user's network profile.
The dialog box in Figure 17 also contains the buttons to create a new profile, edit an existing profile or delete an existing profile. To create a new user profile, click ’New user’. This will bring up the following dialog box:
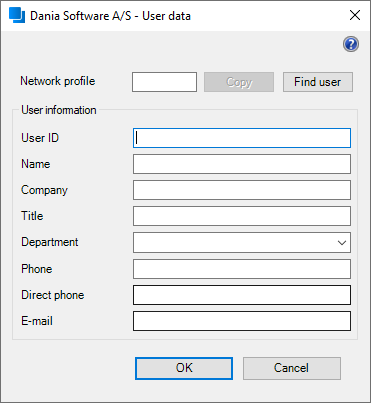
Figure 18
The fields shown in Figure 18 vary depending on the setup chosen for DynamicTemplate.
Users can enter a username in the textbox labelled ’Network profile’ and the ‘Copy’-button will become active. Clicking this button inserts the relevant fields from Active Directory.
When a user clicks ’Copy’, they will be warned as shown in the following dialog box:
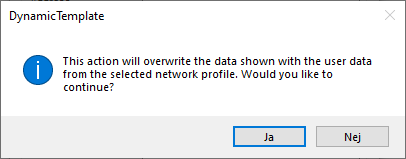
Figure 19
‘Find user’ is used for searching users, who’s ID is not known. When clicking the button, a dialog box will appear containing search fields (relevant search fields can be inserted as required). From version 2.14.000 it is possible to use Azure Active Directory together with DynamicTemplate. If you use this, be aware that it is only possible to copy other’s network profile, if you give consent to an extended set of rights in the portal.
2.1.5.1. Resource drop-down
The profile creation dialog box (Figure 18) can contain one or more drop-down lists. These drop-down lists allow the user to select their department within the organisation.
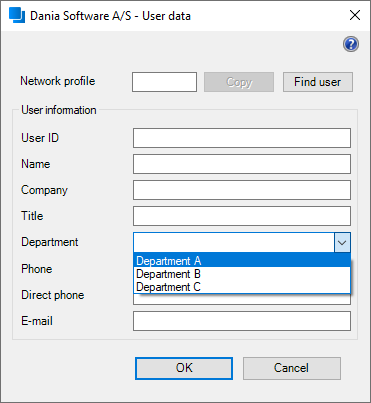
Figure 20
If drop-down lists are available, the user can select their high-level department from the first list. Once selected, further drop-down list(s) activate, enabling the user to select the appropriate sub-department. The values in the drop-down list are determined by the directory structure in the resource folder. It is also possible to enter a new free text value that does not exist in the drop-down list.
Once activated, it is also possible to pre-populate other fields based on the selected values. In this way, related fields such as web and email addresses can be automatically populated appropriately for the selected department.
Set up and activation of drop-down lists is described in section 3.1.9.6. Displaying resource drop-down in user management.
2.1.5.2. User search
Figure 21 shows a dialog box for searching users. In this case “Oliver” is searched and all persons with ‘Oliver’ in their name are shown.
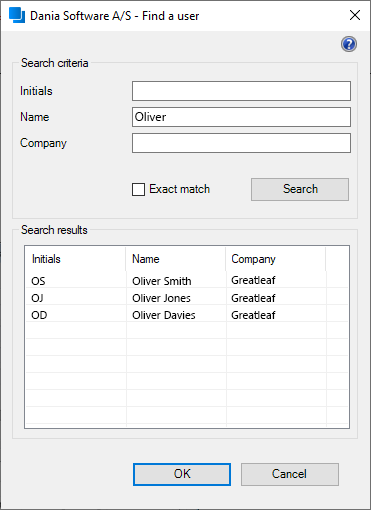
Figure 21
If a more precise search is required, the field ‘Exact match’ is checked and only items with exact values from the Active Directory are returned.
E.g., an exact search for “John” will not return any items, as nobody is called just John – everyone has a surname. On the contrary an exact search for “John Smith” will return this very person.
Note that the shown search fields (and columns in the search result) may vary. Fields are set in the file ‘ActiveDirectoryDefinitions.xml’ as described in section 3.1.7.2. ActiveDirectoryDefinitions.xml
A user is selected by double clicking the name in the list or by marking the user and pressing ‘OK’. The user is then transferred to the dialog box shown in Figure 18 and related Active Directory fields are filled in.
After completed data entering press ‘OK’ and the profile is created and shown in the user dialog box:
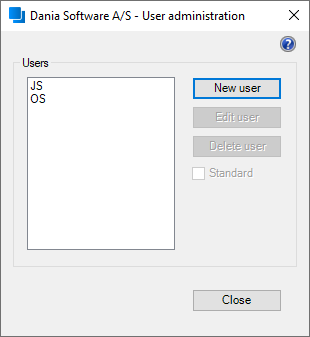
Figure 22
The new profile in the example has been named “JS” and shown in the dialog box. Note that each profile must have a unique name.
2.1.6. Send as PDF

Figure 23
The ‘Send as PDF’ button can be seen in the DynamicTemplate menu tab in Microsoft Office Word, Excel and PowerPoint. Clicking on ‘Send as PDF’ results in the active document, spreadsheet or presentation being converted in to a ’.pdf’ file. This file is then attached to a new email in Outlook (which is also opened if needed).
When the button is activated in Word, any mailing attachments, which are connected to the document, will also be attached to the new email. See section 2.2.17. Attachments for a description of mailing attachments.
If you have Assist Pro, it will be this programme that generates the PDF from DynamicTemplate v. 2.15.000 or newer.
2.1.7. Online/offline
The ’Online/offline’ function provides users the option to use DynamicTemplate without accessing the organisation’s system folders (e.g., due to lack of network access). Sections 3.1. DynamicTemplate system folders and 3.1.9 Setup.xml describe the ’Online / offline’ function.

Figure 24
The button in the ‘Status’ group, shown in Figure 24 indicates whether DynamicTemplate is in ‘Online’ status (and coloured green) or in ‘Offline’ status (and coloured red). Clicking the button allows a user to switch between statuses, and brings up the following dialog box, prompting the user to accept the change of status:
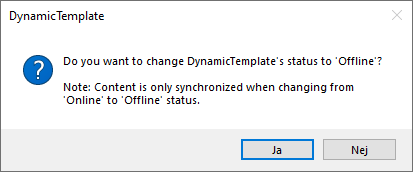
Figure 25
The message in the dialog box will alter to reflect whether the change is to ’Online’ or ’Offline’ status.
The following sections explain the differences between ‘Offline’ and ‘Online’ status.
2.1.7.1. Online status
It is recommended to work in ’Online’ status whenever possible. When the status is displayed as ‘Online’, DynamicTemplate uses the system folders defined for the installation, which are described in sections 3.1. DynamicTemplate system folders and 3.1.9 Setup.xml
Working ’Online’ ensures that users are always working with the latest system folders and content. For this reason, ‘Online’ status is the default mode, and DynamicTemplate will always start in ‘Online’ status.
Note that DynamicTemplate will automatically change to ‘Online’ status if system folders are available provided that this setting is made in the configurations file ‘Setup.xml’ as described in section 3.1.9.8. Auto online
2.1.7.2. Offline status
To enable a user to work ’Offline’, DynamicTemplate uses a local system folder to hold a copy of the ’Online’ system folders. In ‘Offline’ status, this copy is used instead of the usual system folders described in sections 3.1. DynamicTemplate system folders and 3.1.9 Setup.xml.
The contents of the ‘Online’ system folders are synchronised to the local copy of the system folders when the system status is changed from ’Online’ to ’Offline’. The local copy is placed here:
C:\Users\<username>\AppData\Roaming\Dania Software\ConfigSolution
For synchronisation to occur successfully, it is necessary to have access to the ’Online’ system folders.
Access is also required in order to switch back from ’Offline’ to ’Online’ status.
Note that when a user switches from ’Offline’ status to ’Online’ status, the local system folders are not synchronised to the online system folders. Therefore any changes that the user made to the local copy (e.g. updates to user profiles or Standard Content) will need to be manually copied to the online system folders by a user with the appropriate access privileges.
Also note that files that are moved or deleted from the local copy of the system files cannot be automatically regenerated while the system is ’Offline’. To re-synchronise the folders the user must switch to ’Online’ status and then back to ’Offline’ status again. The system folders and contents will then be synchronised to the local copy, and will overwrite the previous copy.
2.1.7.3. Inaccessible system folders
If an Office program starts while the solution status is ’Online’, but the online system folders are not accessible, then ’Offline’ mode will automatically be activated. However, this is only possible if DynamicTemplate has previously been used, via any Office program, while the online system folders were accessible.
This is because certain files are essential for ’Offline’ mode to be functional. These essential files are automatically synchronised to a local copy when DynamicTemplate is used in ’Online’ mode. The templates, user profiles, signatures and resources will not be accessible in this scenario, and therefore the full use of the solution will not be possible.
2.1.8. About/Help

Figure 26
Clicking the ’About’ button in the Dynamictemplate menu brings up the following dialog box:
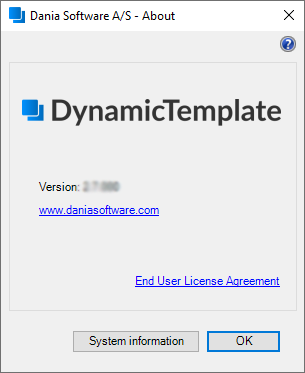
Figure 27
The dialog box shown in Figure 27 displays the version number of the installed DynamicTemplate solution.
Apart from a link leading directly to Dania Software’s website, the dialog box also includes the entries ‘End User License Agreement’ and ‘System Information’.
Through ‘End User License Agreement’ the current agreement is displayed in a new window. Click ‘System Information’ and this dialog box will appear:
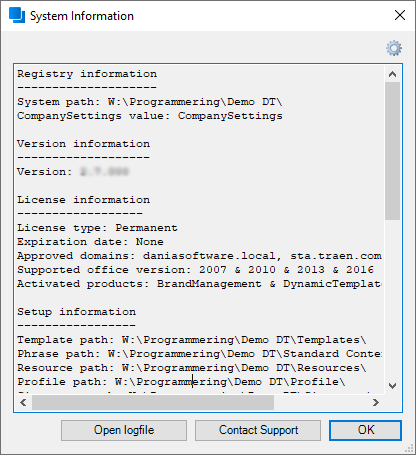
Figure 28
The dialog box contains information on paths from the registration database, software version, license information and paths to the various system folders. When clicking ‘Open logfile’, the DynamicTemplate logfile with an overview of event messages will be opened.
The ‘Contact Support’ button starts a new email to Omnidocs’s support team, with both the log file and a text file listing relevant system information attached. You can type your message and send the email in the normal way.
The 'gear' button opens the ‘Log Settings’ dialog box (see Figure 29), where you can choose between using the standard setting when logging for the user and using extended logging, typically when troubleshooting or performance log for testing speeds. When you select extended logging and performance log, you also select when to return to the standard setting using the date picker. The setting will be available starting in version 2.6.022.
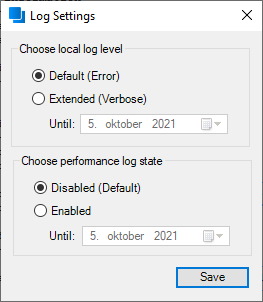
Figure 29
In the top right corner of the dialog box, shown in Figure 27, about DynamicTemplate is the help icon: . Clicking this brings up the ’Help’ dialog box shown in Figure 30:
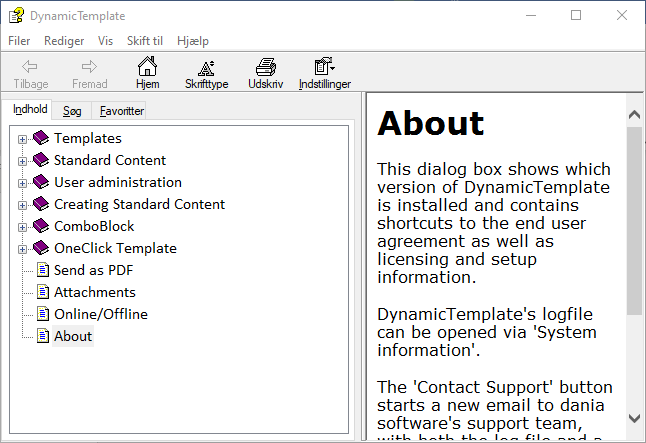
Figure 30
This dialog box provides help and information to users. The left pane contains a list of help topics, so users can find answers quickly. By default, the help topic that relates to the dialog box, where the question mark was clicked, is displayed.
Note that the help icon appears in all DynamicTemplate dialog boxes.
Was this article helpful?
That’s Great!
Thank you for your feedback
Sorry! We couldn't be helpful
Thank you for your feedback
Feedback sent
We appreciate your effort and will try to fix the article