2.2. Microsoft Office Word
The full DynamicTemplate menu in Microsoft Office Word is shown in Figure 31 as it would appear to a Standard Content administrator (see section 2.2.3.2. Standard Content administrators ):

Figure 31
The DynamicTemplate functions and dialog boxes that are specific to Word are described below.
2.2.1. Printer tray selection

Figure 32
‘Printer tray selection’ is a DynamicTemplate function for designating which print trays hold pre- printed paper (i.e. headed paper), and which hold plain white paper. The setting is valid only for the current default printer.
Clicking the ’Printer tray selection’ button shown in Figure 32 brings up the following dialog box:
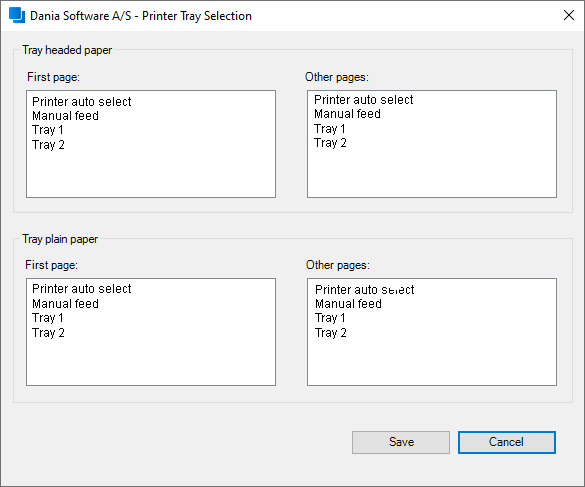
Figure 33
The dialog box in Figure 33 is split into two sections. The top section is for documents that should be printed on headed paper, and the lower section is for documents that should be printed on plain white paper.
One option must be selected in each field to indicate which print tray should be used to print each type of document. Clicking ‘Save’ without selecting an option in all four fields will generate an error message similar to the example shown in Figure 34 below.
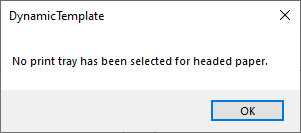
Figure 34
Note that these selections only apply to the current default printer. If a new default printer is selected in Windows, these choices will need to be set again. This is because the settings are associated with a saved port number for the printer, which is typically different for each printer.
The setting from the dialog box shown in Figure 33 is saved locally in usersettings.xml (%appdata%\dania software\Config).
If working with Citrix the printer driver must be installed in the Citrix profile.
2.2.2. Standard Content

Figure 35
In DynamicTemplate ’Standard Content’ refers to text, images, tables, dialog boxes etc. that form a ‘Standard Content Library’. Possible types of Standard Content files include:
- RichBlocks (’.doc’, ’.docx’ and ’.docm’ Word documents)
- TextBlocks (’.txt’ files)
- ComboBlocks (’.tdsx’ files)
All RichBlocks in the form of Word documents include text and formatting.
All TextBlocks in the form of ‘.txt’ files are plain text and do not include formatting.
All ComboBlocks in the form of ‘.tdsx’ files are combinations of other Standard Content blocks which may be a combination of the content types mentioned above.
Clicking the ’Standard Content’ button, shown in Figure 35, brings up the following dialog box:
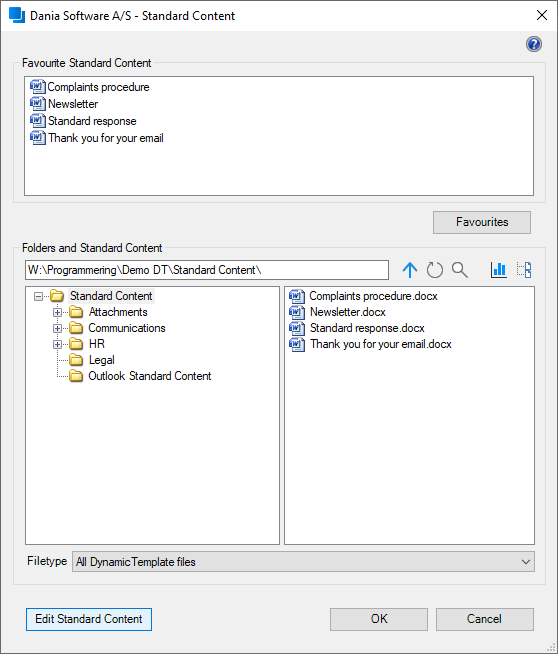
Figure 36
2.2.2.1. Favourite Standard Content
In ’Favourite Standard Content’ (Figure 36) the user can create a shortcut to often used Standard Content.
A shortcut can be created quickly by right clicking the desired Standard Content in ‘Folders and Standard Content’ and choosing ‘Add to favourites’. The shortcut is removed from the favourites list by right clicking it in ‘Favourite Standard Content’ and choosing ‘Remove from favourites’.
The favourites list can also be edited using the button ’Favourites’, bringing up this dialog box:
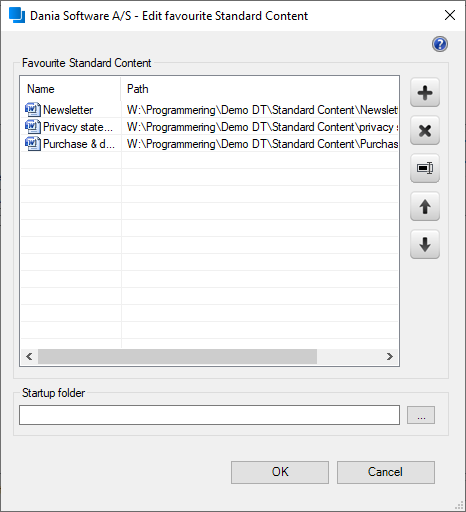
Figure 37
To add a new shortcut you click the ’Add’ button , select the desired Standard Content and click ‘OK’ to accept. Now the following dialog box is brought up:
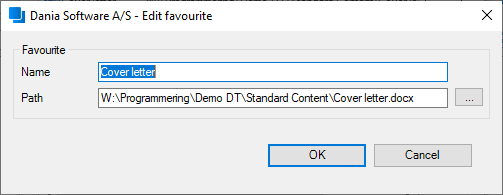
Figure 38
The dialog box is prefilled with the path to the selected Standard Content and the shortcut name that will be shown in ‘Favourite Standard Content’ (Figure 36). Both fields can be edited before the shortcut is saved by clicking ‘OK’. A shortcut is removed by selecting the Standard Content in the list and clicking the ’Delete’
button .
To edit a selected shortcut use the ’Edit’ button , which will bring up a dialog box from Figure 38, where the name or path of the shortcut can be changed.
The order of the shortcuts in the list is adjusted by the buttons ’Move up’ and ’Move down’.
2.2.2.2. Startup folder
It is possible to specify a default startup folder each time the user selects Standard Content in DynamicTemplate. The selected startup folder applies to all ‘Standard Content’ windows in all Office programs.
As with favourite Standard Content it can be done quickly by right-clicking the desired folder, clicking ‘Folders and Standard Content’ (Figure 36) and selecting ‘Set as startup folder’.
Alternatively, the ’Browse’ button next to the ’Startup folder’ field can be used to select the desired folder.
Note that it is not possible to change the startup folder if this is managed centrally (see 2.1.4. Joint user settings ).
2.2.2.3. Standard Content search
With the search function you can search Standard Content and folders in the entire Standard Content library.
The search field is brought up by the ’Search’ button or the keyboard shortcut CTRL+B and a part of the Standard Content name or folder you are looking for is entered.
Depending on the settings, the search results are now either displayed automatically, or the user has to start the search by clicking Enter or the icon in the search field (see 3.1.9.16. Settings for Templates and Standard Content search).
The search results show all found Standard Content and folders as well as their location. It is possible to sort by name and patch by clicking the column heading.
From the search results you can insert and edit Standard Content as normal and found folders can be opened by double-clicking them.
To return to the ordinary file overview use the ’Search’ icon, CTRL+B or Escape to hide the search results again.
2.2.2.4. Statistics
The button ’Statistics’ is part of the Statistics module, which is an add-on to DynamicTemplate. Find further information here 3.8. Statistics Module (add-on).
2.2.2.5. Standard Content overview
Standard Content administrators have access to the ‘Show/Hide Standard Content overview’ button . Note: The Standard Content overview must be able to communicate with the Cloud service as described in 4. System prerequisites . Click the button to display the following panel:
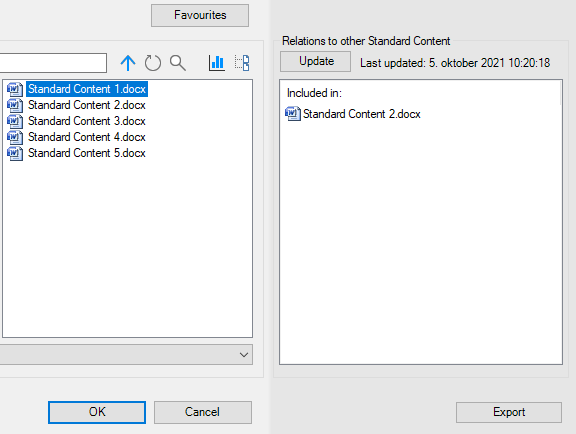
Figure 39
When a Standard Content item is selected in the browse window (left), the new panel (right) lists all the Standard Content items that include the selected item. The list is always sorted by location. Hover the mouse over a listed item to view the file path in the tooltip.
Click ‘Update’ to refresh the list of linked items and map the relationships between all the files in the Standard Content folder. The timestamp of the latest update is shown above the list. Because updates affect all Standard Content administrators, the value indicates the latest update made by anyone in the team.
Click ‘Export’ to generate a PDF listing all the displayed Standard Content items, together with their full file paths.
2.2.2.6. Edit Standard Content
This button is only visible for users with access to create Standard Content, i.e. Standard Content administrators (refer to section 2.2.3.2. Standard Content administrators ).
A Standard Content administrator can edit Standard Content in one of two ways:
- By clicking ’Standard Content’ in the menu, navigating to the relevant Standard Content item, and clicking on ’Edit Standard Content’ as illustrated in Figure 36 above.
- By navigating to the Standard Content item in the system folders and opening the document (refer to section 3.1.3. Standard Content). This method is not recommended for editing ComboBlocks.
Depending on the type of Standard Content that is opened, the following will occur:
RichBlocks
These are Word documents, and open as standalone documents. If the RichBlock was originally created using DynamicTemplate, then all the buttons under ‘Standard Content Creation’ will be active.
TextBlocks
These are plain text files that will be opened in your normal .txt file editor (e.g. Notepad)
ComboBlocks
ComboBlocks (tdsx) will open in the dialog box ‘Administration of ComboBlocks’, described in section 2.2.16. Creating ComboBlocks.
2.2.2.7. Inserting Standard Content
As described under 2.2.2. Standard Content there are three types of Standard Content blocks for Word:
- RichBlocks (’.doc’, ’.docx’ and ’.docm’ Word documents)
- TextBlocks (’.txt’ files)
- ComboBlocks (’.tdsx’ files)
Each type of Standard Content has its own properties as well as some general ones, which are described below:
RichBlocks
RichBlocks are inserted in a way that conforms to the document that they are inserted into. For example if there is a format conflict between the RichBlock and the main document, the RichBlock’s format is altered to match that of the main document. This ensures that the main document controls the formatting.
In practice this means that text formatted as ’Heading 1’ in the RichBlock, will be reformatted to match the style defined as ’Heading 1’ in the main document.
For example imagine the RichBlock defines a section of text as ’Heading 1’, and ’Heading 1’ is styled as ‘Courier, 20pt, Bold’. Imagine also that ’Heading 1’ in the main document is styled as ‘Arial, 28pt, Italic’. When the RichBlock is inserted in the main document, the ‘Heading 1’ text will use ‘Arial, 28pt, Italic’, as defined in the main document.
Please be aware that the Word Standard Content cannot be inserted in restricted edit mode.
Headers and footers of Standard Content must be empty as the headers and footers are controlled by the main document.
If Standard Content has headers or footers, the design of the document will be altered when inserting the Standard Content. However, in most cases these headers and footers will be removed automatically.
Adaptation of Standard Content is further described in APPENDIX I – Standard Content adaption.
Finally, Standard Content cannot use columns as they can also affect the design of the main document.
TextBlocks
TextBlocks are inserted without formatting, as formatting cannot be defined in ’.txt’ files. The text simply takes on the format of the document that it is inserted into. This is determined by the context within the document where the new text is placed.
For example, if a TextBlock is inserted in the paragraph where the surrounding text format is ‘Verdana, 13pt, Italic’, this will also be applied to the inserted text.
ComboBlocks
ComboBlocks are used to combine content blocks. They contain references to other content blocks but no actual content or text.
Each content block in a ComboBlock is inserted depending on its type as described above and in immediate succession.
In addition, ComboBlocks can also contain appendices that are automatically inserted on the final page of a Word document. Appendices inserted in this way retain their original format. For each section of inserted appendices the below points of configuration will be set to ensure that the original formatting is retained.
- Page orientation (portrait and landscape)
- Margins
- Whether odd and even headers/footers are different
- Whether different first page (header/footer) is set
- Distance from the edge to the header
- Distance from the edge to the footer
- Vertical adjustment of the page
Note that all content of the headers and footers will be removed when inserted.
In Outlook e-mails appendices are inserted as attachments.
Further information on the creation and use of ComboBlocks can be found under 2.2.16. Creating ComboBlocks.
In general
Each time Standard Content is inserted into Word, the document title is updated with the content of the first-occurring header – whether the heading originates from the template or the inserted Standard Content.
This is important in relation to certain integrations where the title is displayed or included, and to increase the general accessibility of the document.
The current document title can always be inspected and edited by clicking ’File > Info > Title’.
2.2.3. Standard Content fields
Besides types of content, such as text, images, tables, etc., Standard Content can also contain various Standard Content fields. A Standard Content field functions as a place holder where the content only can be added when the Standard Content is inserted in a template. Under the Standard Content creation, the administration inserts Standard Content fields in a position where the text may vary, e.g. the name of a recipient, a date deadline or a text piece relating to a case.
When inserting Standard Content, the user will see a dialog box with fields for each Standard Content field in the Standard Content. Depending on the structure of the Standard Content, several consecutive dialog boxes may be displayed. Throughout the process it is possible to cancel the insertion of Standard Content by clicking ‘Cancel’ or the Escape key.
The user enters or selects the desired content if not already completed with information from the template or a line of business system. When the user approves the content, it is inserted in the respective fields’ positions in the text.
2.2.3.1. Merging of Field Values
During the insertion, the identical Standard Content field values will be remembered between the Standard Contents so the user will not be prompted for the same entry more than once.
Ex.: Both Standard Content A and Standard Content B contain a text box called “Field 1” (see Figure 40. The Standard Content will be inserted in the document at the same time and the user only sees one “Field 1” text box in the dialog box – but the entered value is inserted in all the positions where “Field 1” occurs.
However, this only applies when the Standard Contents are inserted simultaneously. For instance, If Standard Content A is inserted when the document is created and Standard Content B is inserted manually later on, the user will be re-prompted for a value to “Field 1”.
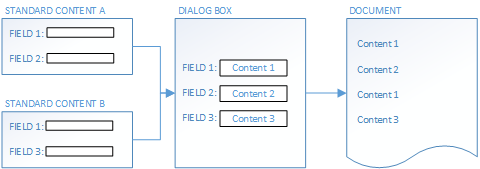
Figure 40
For fields with options (Combo Box and Combo Content), the dialog box will only show the options from the first occurrence of the field. The user’s choice will then be inserted in all future fields with the same name regardless of the options available in these fields.
2.2.3.2. Standard Content administrators
Only Standard Content administrators are able to create and/or edit Standard Content blocks.
Management of Standard Content administrator status is conducted using Active Directory. Prior to delivery of DynamicTemplate the client will be asked to name the security group that will relate to Standard Content administrator status e.g. ‘StandardContentAdmin’.
Active Directory users included in this group must have write access to the system folders that contain the Standard Content library (described in section 3.1.3. Standard Content).
The name of the security group associated with Standard Content administrators is defined as described in section 3.1.9.2. Standard Content administrators . Standard Content administrators can see the buttons ’Edit Standard Content’ (in the ’Standard Content’ dialog box, see Figure 36), and the ‘Standard Content creation’ and ‘ComboBlocks’ groups shown in Figure 41below:

Figure 41
2.2.4. Create Standard Content

Figure 42
Clicking the ’Create Standard Content’ button brings up the following dialog box:
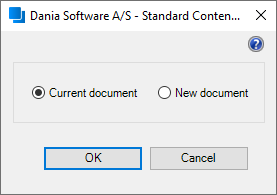
Figure 43
The dialog box in Figure 43 gives the user the choice of creating a new Standard Content item from the current document or using a new document.
Clicking ’OK’ after choosing either option brings up the following dialog box:
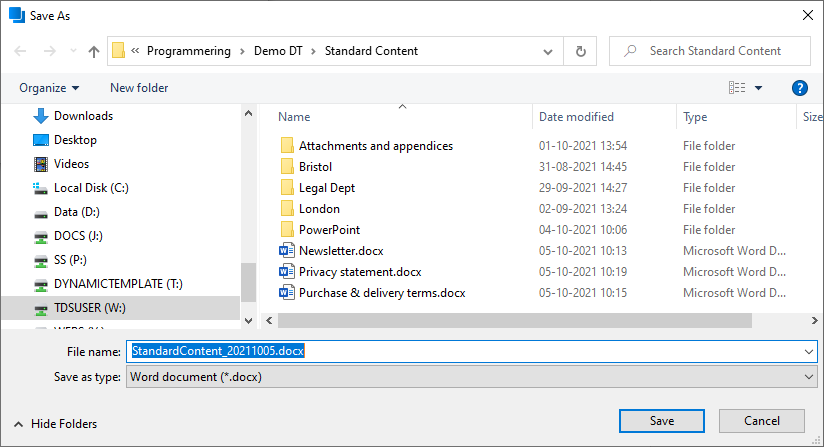
Figure 44
The dialog box in Figure 44 is used to select the folder where the new Standard Content item should be saved. The default location for saving new items will be the startup folder described in section 2.2.2.2. Startup folder . In the case that no startup folder has been assigned, then the main Standard Content folder will be used as the default storage location.
By default new Standard Content items will be named ‘Standard_Content_<yyyymmdd>’ (i.e. year, month, date). The file type can be selected via the drop-down menu.
If the Standard Content is being created from the current document, then the current document content will be used to create the new Standard Content block. Alternatively, if ‘New document’ was chosen then an empty document will be used to create the new Standard Content block.
2.2.5. Edit Fields
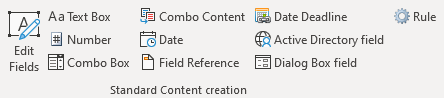
Figure 45
Once a Standard Content block has been created, and is open, the buttons shown in Figure 45 will become active in the DynamicTemplate menu.
Clicking ‘Edit fields’ will bring up the following dialog box:
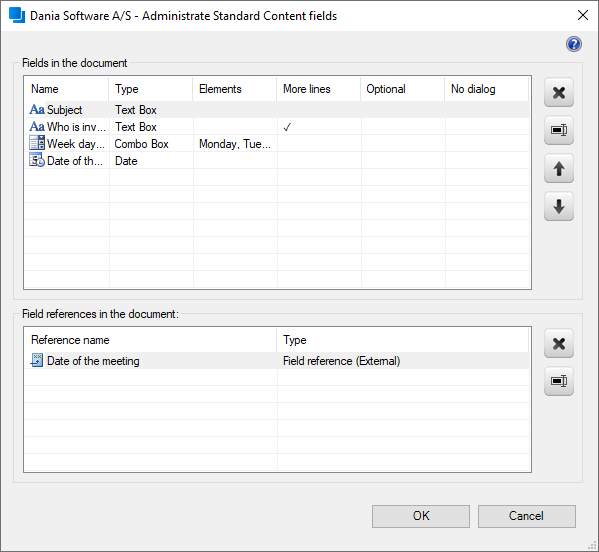
Figure 46
The fields shown in Figure 46 make a complete list of the fields that are included in DynamicTemplate’s menu, and are described in the following sections.
The order of the fields in the top window in Figure 46 is the order in which the user will be prompted to complete the fields as the content block is inserted into a document. However, the user will not be prompted for fields where the “Exclude from Standard Content dialog” setting is activated. See the example below:
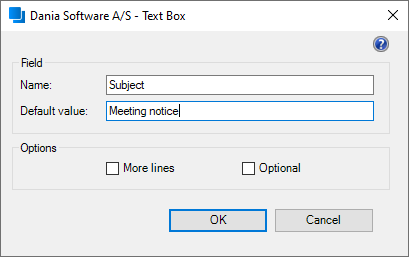
Figure 47
The buttons on the right side of the dialog box in Figure 46 can be used to delete, edit, and
change the order of the fields. Clicking the ‘edit’ button, will bring up a new dialog box identical to that used in the creation of a new field, as described below. By the way, it is possible to generate the ‘edit’ functionality by simply double-clicking a Standard Content field.
The Standard Content fields should always be deleted from this dialog box and not the text itself, as this could potentially cause structural errors in the Standard Content.
Available fields can be inserted anywhere in the text section of the content block. However, fields cannot be inserted in headers and footers nor in figures, footnotes, and comments.
2.2.6. Text Box
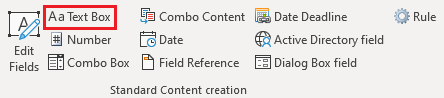
Figure 48
A text box can be inserted at the cursor location by clicking ’Text Box’ in the menu in Figure 48. This brings up the following dialog box:
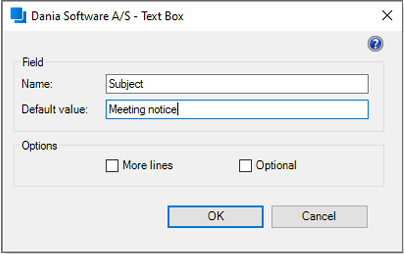
Figure 49
The dialog box in Figure 49 can be used to specify a name for the text box. The name will be used when a user is prompted to complete the text box, shown in Figure 50 (i.e. when the content block is inserted into a document). The name will also be displayed in the field overview shown in Figure 46.
You can enter a value in the ‘Default value’ field that will be shown when the Standard Content is inserted. The user can choose to edit the value or leave it as is to be inserted into the document.
Under ‘Options’ the user may select whether more lines in the field should be entered and whether the field should be optional. If the field is made optional, the user will not be forced to fill in the field with a value when inserting the Standard Content.
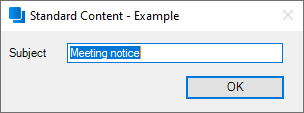
Figure 50
When Standard Content containing a textbox is inserted into a document, the field will either be blank or contain the default value (if defined). After any edits made by the user, the content of the textbox will be inserted within the Standard Content at the location of the textbox. The inserted content will be formatted to match the font, size and colour of the template’s design.
Figure 51 shows an example of a dialog box prompting a user for completion. This text box field was created with ‘More lines’ checked (see Figure 49).
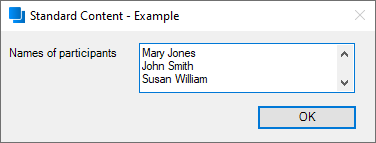
Figure 51
If both examples, from Figure 50 and Figure 51 are created in the same Standard Content block, then the user will be prompted for both pieces of information when the Standard Content block is used, as illustrated in Figure 52 below.
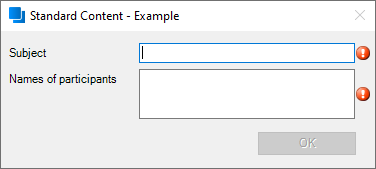
Figure 52
2.2.7. Number
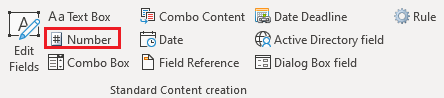
Figure 53
With a number field, the user will be requested to enter a value which can only include numbers. A number field is inserted at the cursor position by enabling the button ’Number’ in the menu (Figure 53). This generates the following dialog box:
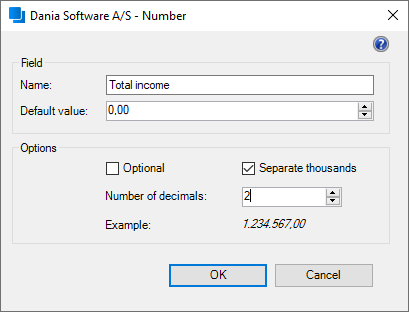
Figure 54
In the dialog box illustrated in Figure 54, the number field is given a name which the user is prompted with when the Standard Content is inserted in a document (see example in Figure 55 below). This will also be the name appearing in the overview of Standard Content fields after the field is set up (see e.g. Figure 46).
You can enter a value in the ‘Default value’ field that will be shown when the Standard Content is inserted. The user can choose to edit the value or leave it as is to be inserted into the document.
Under ’Options’ it is selected whether the field should be optional to complete and how the value should be formatted. It is possible to specify whether the value should appear with or without thousands separator and also how many decimals the value should include.
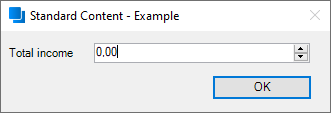
Figure 55
When Standard Content containing a number field is inserted into a document, the field will either be blank or contain the default value (if defined). Regardless of whether the user edits the field or leaves the value as is, the number will already be displayed using the final numerical formatting. The number will be inserted within the Standard Content at the location of the number field. The inserted number will be formatted to match the font, size and colour of the template’s design.
2.2.8. Combo Box
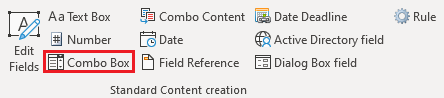
Figure 56
A combo box can be inserted at the cursor location by clicking ’Combo Box’ in the menu in Figure 56. This brings up the following dialog box:
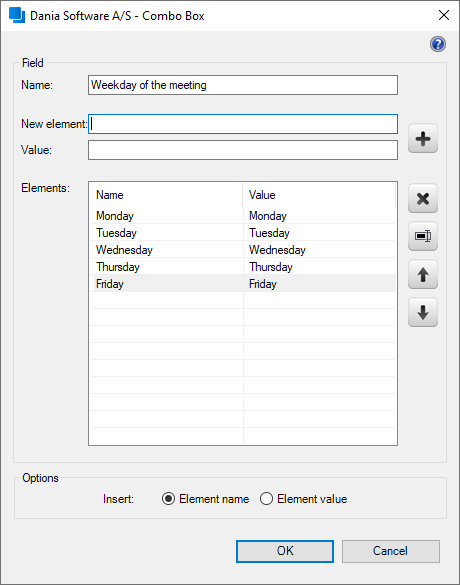
Figure 57
The dialog box in Figure 57 allows a name to be entered for the combo box. The name will be used when a user is prompted to complete the combo box, shown in Figure 59 (i.e. when the content block is inserted into a document). The name will also be displayed in the field overview shown in Figure 46.
A combo box contains a set of elements, one of which can be inserted into the document. Each element includes a name and a value.
The element’s name will always be visible in the dialog box used to insert the Standard Content. Whether the name and/or value is inserted into the document can be set as desired. Enter the desired name and value, and press Enter or click the button. The new element will appear under ‘Elements’ (see example in Figure 57).
Editing of an element may be carried out by clicking the button. The element’s name can be edited by selecting the name in the list, and then clicking on the name again:

Figure 58
At the bottom of the dialog box either ’Element name’ or ’Element value’ can be selected corresponding to the content that should be used when the Standard Content is inserted. If desired, the element name or value can also be used elsewhere in the Standard Content. This is done by inserting a field reference and selecting the desired content. This enables the display of the element name or element value, independent of the settings used in the combo box.
Click ‘OK’ to insert the combo box into the Standard Content block.
When the Standard Content block is inserted into a document, the user will be prompted to choose one of the elements from a drop-down list. The drop-down list can be viewed by clicking on the down arrow to the right of the element displayed, or by using the arrow keys. Figure 59 shows an example dialog box associated with a combo box field:
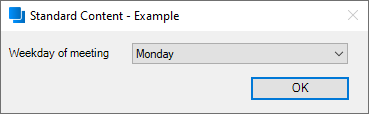
Figure 59
Upon clicking ‘OK’, the element selected by the user will be inserted into the document at the location of the combo box. The inserted text will be formatted to conform to the template’s font, size and colour.
2.2.9. Combo Content
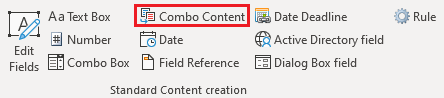
Figure 60
A Combo Content field may be inserted at the cursor position by enabling the button 'Combo Content' as illustrated in the menu in Figure 60. You see the following dialog box when enabling the button:
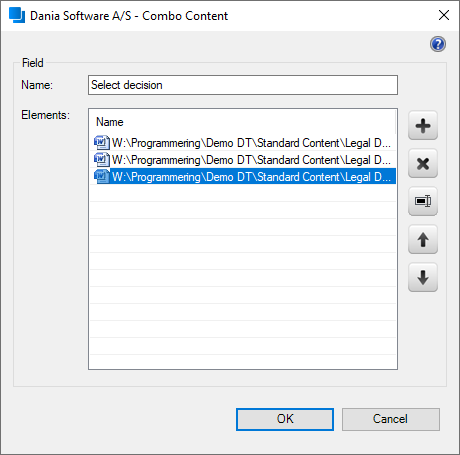
Figure 61
The Combo Content may be named in the dialog box in Figure 61. The name of the Combo Content will be the name which the user is prompted with when the user tries to insert the Standard Content in a document (see example below in Figure 62). The name will also be the name which appears from the list of Standard Content fields (see for example Figure 46).
When the user tries to insert the Standard Content in another document, the user will be prompted to click and select one of the Standard Content items in a dropdown list. Alternatively, the arrow buttons may be used to scroll through the options. If only one element has been added to the list, the field will not be displayed in the dialog box but will just be inserted automatically.
In Figure 62, you find an example of a dialog box where Standard Content containing a Combo Content is inserted:
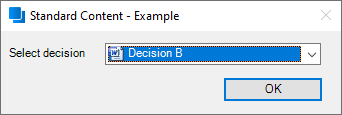
Figure 62
By clicking the 'OK' button, the user is prompted to fill in all fields if they exist in the selected Standard Content:
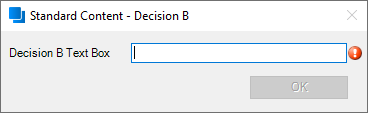
Figure 63
Then, the selected Standard Content and the associated field values are inserted in the document where the cursor is positioned in the document.
2.2.10. Date
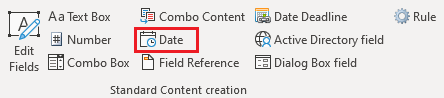
Figure 64
A date field can be inserted into a Standard Content block by clicking the ‘Date’ button shown in Figure 64. This brings up the following dialog box:
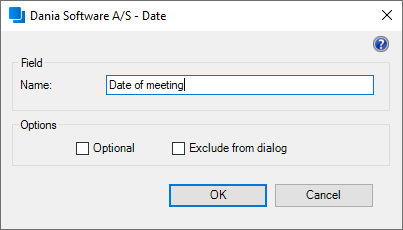
Figure 65
The dialog box in Figure 65 allows the user to enter a name for the date field and it is possible to specify whether the field should be optional and/or whether the field should be excluded from the Standard Content dialog box. If the field is made optional, the user will not be forced to specify a value in the field. If the field is excluded from the Standard Content dialog box, the user will not be prompted for a value and the current date will be inserted automatically.
The name will be used when a user is prompted to complete the date field, shown in Figure 66 (i.e. when the content block is inserted into a document). The name will also be displayed in the field overview shown in Figure 46.
For example, if the date field is named ’Date of meeting’, the following dialog box will appear when the Standard Content block containing the date field is inserted into a document:
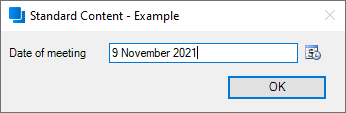
Figure 66
The default value shown in the dialog box will be the current date. Clicking on the calendar icon to the right of the current date will cause the drop-down menu shown below to appear:
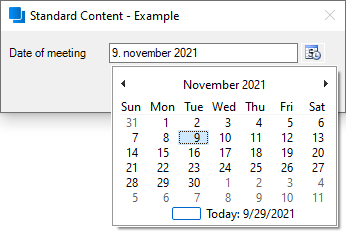
Figure 67
The user can navigate the drop-down menu and select the date that he or she wishes to insert in the text.
The user can select the correct date from this menu. Clicking ‘OK’ inserts this date into the document at the location of the date field. The inserted text will be formatted to conform to the template’s font, size and colour.
The date format of the inserted date will be read out from the configuration file ’Setup.xml’ as described under 3.1.9.13. Date format . The language in the dropdown menu depends on the regional settings in Windows.
In case no standard format is specified in the configuration file, the date will be inserted as short date format, as illustrated in Figure 67.
2.2.11. Field reference
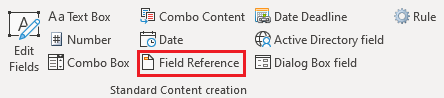
Figure 68
Field references can also be inserted into Standard Content blocks. These are used when the result of another field is needed in several places within the Standard Content block, so that the end user only needs to enter each piece of information once. Clicking the ’Field Reference’ button shown in Figure 68 brings up the following dialog box:
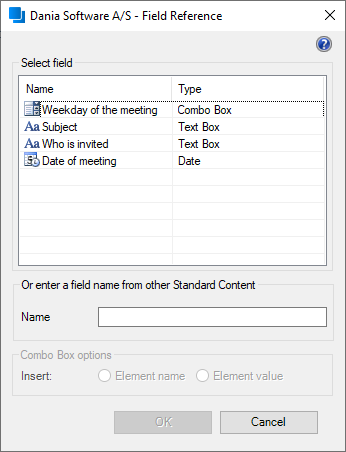
Figure 69
The dialog box shown in Figure 69 allows Standard Content administrators to reference a previously created field from the same Standard Content block. Selecting a field and clicking ‘OK’ inserts the reference at the cursor location within the Standard Content block.
Note: Only combo boxes provide the option to change whether the element name or value is to be used, regardless of how the combo box was initially set up.
Inserting a field reference automatically repeats the result of the referenced field at the new location within the document when the Standard Content block is inserted. The user will not be re-prompted to complete this text.
It is also possible just to enter a field name under ”Or enter field name from other Standard Content”. If the Standard Content is inserted simultaneously with another Standard Content containing a field with the stated name, the field reference will repeat the value of the field (see 2.2.3.1. Merging of Field Values ). On the other hand, if there is no field with that name when the Standard Content is inserted, the user will be prompted for an entry as with a normal text box.
Therefore, a field reference for another Standard Content should only be used in situations where the reference field is inserted first. If fields are inserted after the reference, the user will be prompted for a value for the empty reference field which will then be overwritten afterwards with the value from the inserted field.
2.2.12. Date deadline
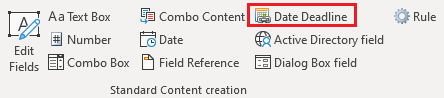
Figure 70
The date deadline field makes it possible to insert a date where X days are added or deducted. A date deadline field may point at another date field and may therefore function as a reference – or you may use the built-in date deadlines 'Today' and 'Next month' where 'Next month' will always be the first day of the next month.
By clicking 'Date Deadline', the user will see the following dialog box:
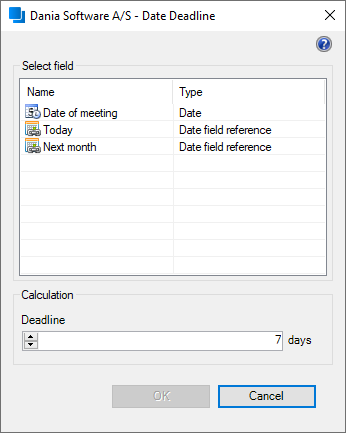
Figure 71
First, the user selects a date to which x days is added according to requirements. By default, 7 days are added to the selected date.
When the date deadline field is inserted in the Standard Content, the date deadline field will illustrate which field it refers to and how many days are added to the field (date deadline fields are written in italics):
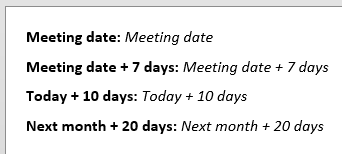
Figure 72
Please note that date deadline fields are not displayed in the dialog box when inserting the Standard Content in a document but will be automatically calculated based on the user’s input in the date field.
When the Standard Content is inserted in another document, an example of a dialog box would merely be as illustrated below:
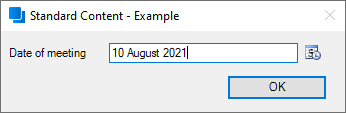
Figure 73
The below figure illustrates the inserted Standard Content, including date and date deadline fields:
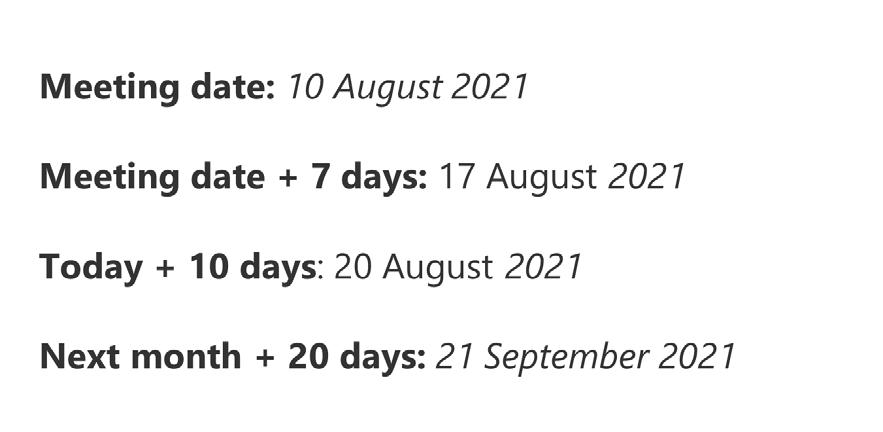
Figure 74
2.2.13. Active Directory field
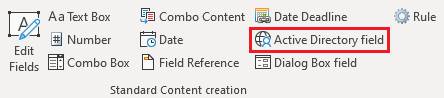
Figure 75
Fields can be inserted that will automatically fill-in user information from Active Directory when the Standard Content block is inserted in the document.
To insert such fields, click ‘Active Directory field’ as shown in Figure 75 and the following dialog box will appear.
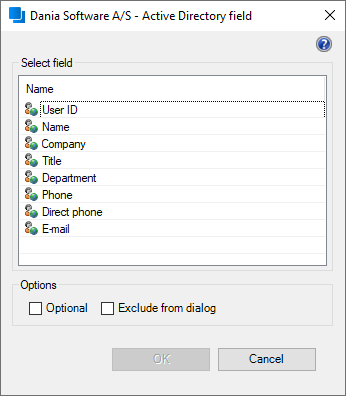
Figure 76
The dialog box shown in Figure 76 allows the user to select the Active Directory field to be inserted in the Standard Content at the cursor location, and to define whether the field should be optional and/or whether the field should be excluded from the Standard Content dialog box. If the field is made optional, the user will not be forced to specify a value in the field. If the field is excluded from the Standard Content dialog box, the user will not be prompted for a value.
Available fields depend on which fields are set up in the configuration file ‘ActiveDirectoryDefinitions.xml’ placed in the folder storing configuration files, as described in section 3.1.7.2. ActiveDirectoryDefinitions.xml.
When inserting the Standard Content, Active Directory fields will be like text fields as described in section 2.2.6. Text Box . However, the fields will be prefilled with the user information from Active Directory.
2.2.14. Dialog box field
When a template is opened, the user is typically presented with a dialog box where various details can be selected or entered. It is possible to use values from this dialog box directly within Standard Content.
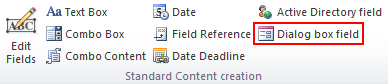
Figure 77
To do this, click the ’Dialog box field’ button to insert a new field.
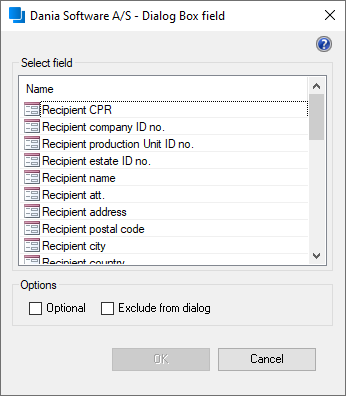
Figure 78
Select the desired field from the detailed overview and specify whether the field will be optional and/or hidden from the Standard Content dialog box. An optional field that is left blank will not prompt the user for input, and a hidden field will not be shown in the Standard Content dialog box when the Standard Content is inserted.
When the Standard Content is inserted, the user will see a dialog box showing the retrieved value. This value can be altered as necessary before it is inserted as a text field.
Before dialog box fields can be used with a given template, they must be configured in ’DialogFieldDefinitions.xml’ as described in section 3.1.7.3. DialogFieldDefinitions.xml .
2.2.15. Rule
This field is part of the Rule Engine add-on. You will find further information in 3.9.2. Rule .
2.2.16. Creating ComboBlocks

Figure 79
The ComboBlock function extends the options for creators of Standard Content blocks. ComboBlocks are used to combine individual Standard Content blocks and PDF-files.
ComboBlocks are particularly suited for cases where several departments use the same Standard Content blocks, but in different contexts. For example, consider a Standard Content block titled ‘If you need to complain’ that was created by a Standard Content administrator in the legal department. This text is used by several other departments, where the complaints text is inserted between department specific content blocks maintained locally by each department.
Clicking ’Create ComboBlock’ brings up the dialog box shown in Figure 80 below.
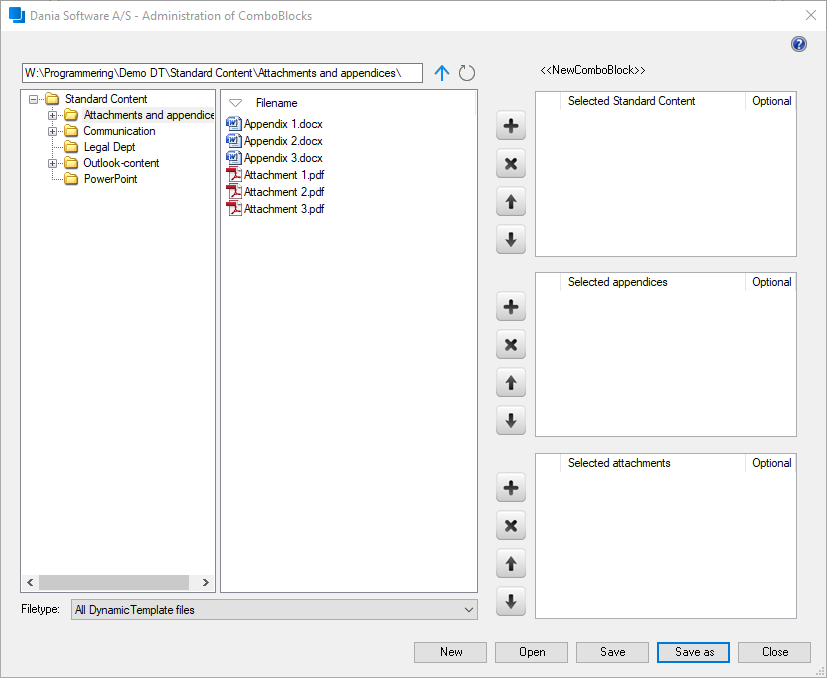
Figure 80
On the left side of the dialog box (in Figure 80) is a navigation area allowing Standard Content administrators to browse the Standard Content library and filter by document type. The required files can be selected and by using the 'plus' button, or via drag and drop, Standard Content administrators can build up a chain of content blocks on the right of the dialog box.
The order of the selected Standard Content blocks can be altered by selecting a block and using the 'up' and 'down' buttons. Blocks can also be removed by clicking , or using the ’Delete’ key while the block is selected.
To move or delete several Standard Content blocks at once, the ’Ctrl’ key can be held down while each block is selected with the mouse.
The buttons at the bottom right of the dialog box in Figure 80 allow Standard Content administrators to create a new ComboBlock, open an existing ComboBlock, save changes, or save as a new ComboBlock. Clicking ‘Save as’ brings up the following dialog box:
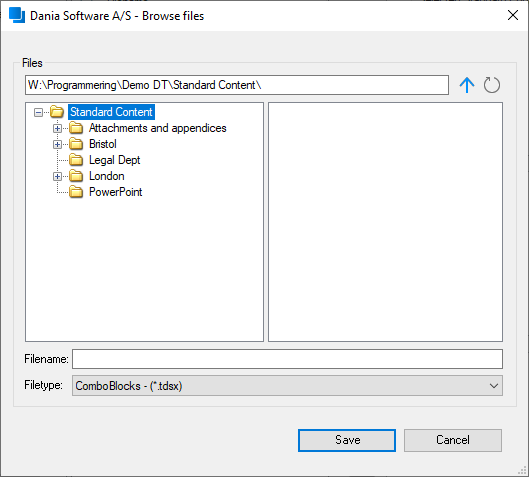
Figure 81
The dialog box shown in Figure 81 is used to select the folder where the new ComboBlock should be saved. The default save location will be the startup folder (refer to section 2.2.2.2 Startup folder ) – unless no startup folder has been selected in which case the root of the Standard Content library will become the default location. The file type for ComboBlocks is always ‘ComboBlocks – (*.tdsx)’.
When a ComboBlock is inserted into a document, each Standard Content block that is referenced is inserted individually and in immediate succession.
2.2.16.1. Appendices
Appendices shown in the ’Selected appendices’ pane in Figure 80 behave differently from other Standard Content blocks in a ComboBlock in the following ways:
Word document:
- Appendices are inserted on a new page after the closing section of the main document, e.g. after the signature section of a letter, as defined by each template.
- Appendices retain their own formatting and are not conformed to the template design. This allows greater flexibility in the types of appendix items that can be added.
Outlook email:
- In emails appendices are inserted as attachments.
2.2.16.2. Attachments
It is only possible to add PDF files in the pane ‘Selected attachments’ in Figure 80.
By inserting a ComboBlock containing an attachment, the attachment will be connected to the document as described under 2.2.17. Attachments .
2.2.16.3. Optional ComboBlock
Next to every Standard Content/appendix which was added to the ComboBlock you find the tick option 'Optional' as illustrated in the figure below:
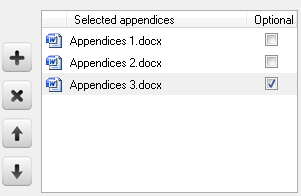
Figure 82
If the Standard Content/appendix is specified as 'Optional', the user will see the below dialog box when inserting the ComboBlock which makes it possible to select or reject the insert of the Standard Content/appendix:
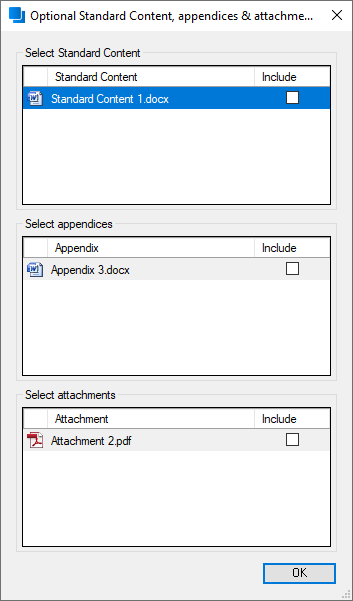
Figure 83
By clicking the 'OK' button, the ComboBlock and the other optional Standard Content/appendix options are inserted.
2.2.17. Attachments

Figure 84
The “Attachments” button on the DynamicTemplate band in Word offers a possibility to attach PDF files to the document.
When a PDF file is attached to the document as an attachment, the content of the PDF file will not be inserted directly into the document. Instead, a reference to the PDF file constituting the attachment is saved.
Attachments are not to be mixed up with appendices in ComboBlocks as the appendices in ComboBlocks are inserted as part of the current document, cf. section 2.2.16 Creating ComboBlocks
Sending a document may either take place by using the function “Send as PDF”, cf. section 2.1.6 Send as PDF or by using one of the Output Management integrations which are found in DynamicTemplate and are used through the group “Delivery”, e.g. Doc2Mail.
2.2.17.1. The Side Panel “Attachments”
When clicking the “Attachments” button on the DynamicTemplate band, a side panel is activated from where the attachments of the current document can be managed. The below figure illustrates Word with the side panel open.
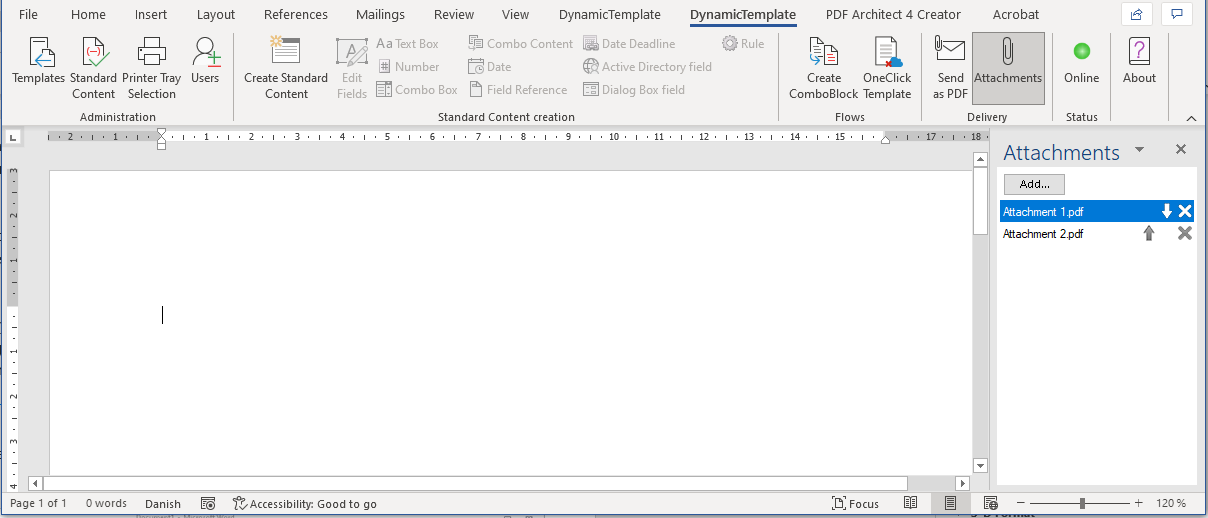
Figure 85
The side panel can be hidden again by clicking “Attachments” on the DynamicTemplate band or by clicking the cross in the upper right corner of the panel.
The attachment can be added either by clicking the “Add...” button or by right clicking on the list and then choosing “Add...” from the context menu.
Attachments may be removed by clicking the cross next to the attachment you wish to remove.
The order of attachments can be changed by clicking the arrows next to the individual attachment. The order is critical to how the attachments are processed by the individual Output Management system. The attachments will for instance be printed and put in envelopes in the given order when the document is sent to external printing.
The user may see the individual attachments by right clicking on them and selecting “Show” in the context menu. Thereby, the attachment will open in the computer’s standard programme for PDF files.
Was this article helpful?
That’s Great!
Thank you for your feedback
Sorry! We couldn't be helpful
Thank you for your feedback
Feedback sent
We appreciate your effort and will try to fix the article