3.9. Rule Engine (add-on)
Omnidocs offers the ‘Rule Engine add-on’ which automatically selects and inserts document content.
In the following section, you will find a description of the Rule Engine’s new field: ‘Rule’.
Please contact Omnidocs for further information on the Rule Engine.
3.9.1. Rule field administrators
Before rule fields can be used, ‘Setup.xml’ must be modified to specify which Standard Content administrators should have access to the ‘Rule’ button (and be able to create rules).
These administrators must be members of the security group specified by the element Setup -> Security -> FeatureAdministratorsGroupNames -> RuleField.
The security group name could be as shown in this sample of ‘Setup.xml’:
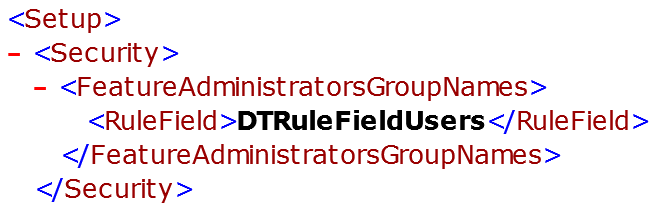
Figure 139
Multiple security groups may be included if desired. To do so, use a pipe separated list (‘|’), e.g. <RuleField>Group1|Group2</RuleField>.
This feature is present from version 2.7.000.
3.9.2. Rule

Figure 140
Rules render it possible to make comparisons and calculations based on existing Standard Content fields and based on the outcome, insert a result in the form of a value, a field or even a Standard Content.
A rule is inserted at the cursor position with the button ’Rule’ (Figure 140) which generates the following dialog box:
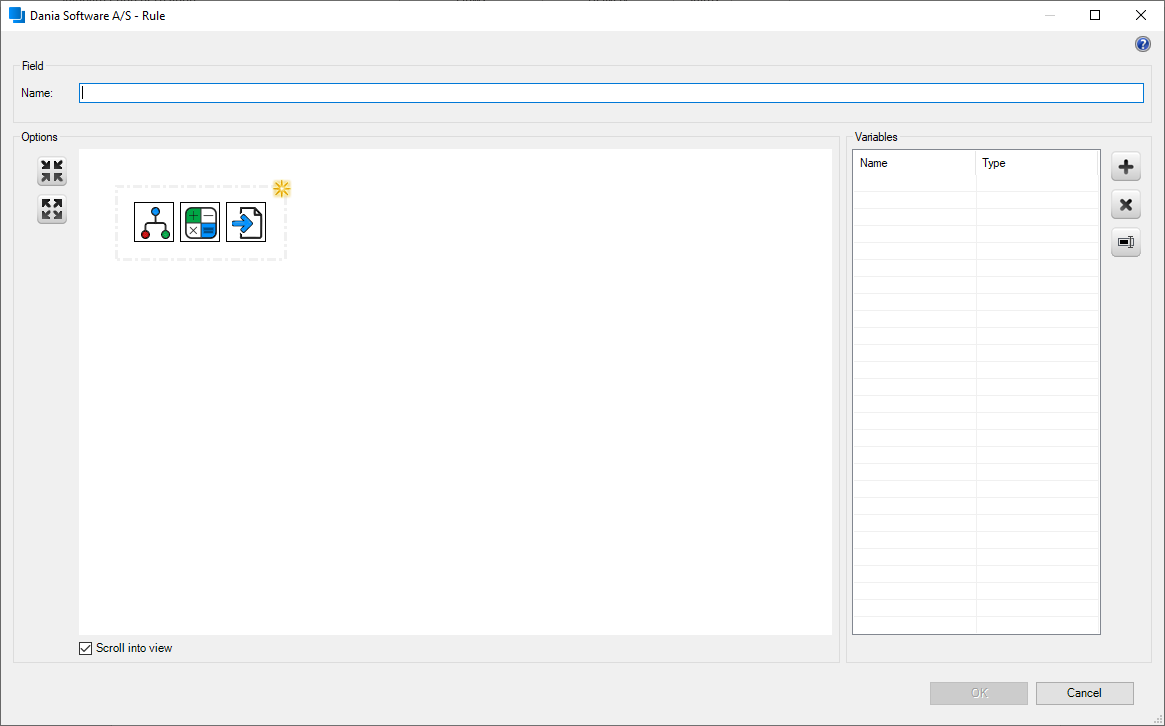
Figure 141
A rule consists of a number of links where each link is set up for at specific comparison or calculation. The links are connected in a chain and when the rule is activated, the first link in the chain is processed. The link is always found in the upper left corner. When the link is finished, it continues to the next relevant link in the chain. It continues until all links are reviewed.
Regardless of the link combination, a rule must always end with a result link inserting content in the document.
3.9.2.1. Link
When a new rule is created, a suitable name must be stated in the ’Name’-field at the top in the dialog box. Click one of the symbols in the link selector to add a link to the rule:
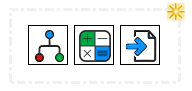
Figure 142
There are three different link types: If , Calculation and Result . In the following section, you will find a description of the different links and how they are set up correctly.
If
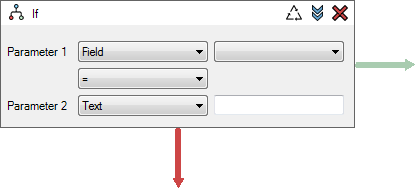
Figure 143
In an If link a statement is set up which can be true or false. When the rule is carried out, the circumstances between the two parameters and depending on the drop-out, the rule continues along the horizontal, green connection (true) or the vertical, red connection (false) to the next link in the chain.
It is important that a link is connected to both connections – an empty connection will result in an error when the Standard Content is inserted.
The If link is set up by selecting two parameters and an operator which states the relation between the content of the parameters. Below, you find a list of all possible parameters and operators, including a short explanation:
| Parameter | Explanation |
|---|---|
| Birth no. (age) (NO) | The person’s age (whole years) from a field with a Norwegian Civil Registration Number. |
| Birth no. (gender) (NO) | The person’s gender from a field with a Norwegian Civil Registration Number. |
| Calculation result | The result from the most recent calculation link. |
| Cpr.no. (age) (DK) | The person’s age (whole years) from a field with a Danish Civil Registration Number. |
| Cpr.no. (gender) (DK) | The person’s gender from a field with a Danish Civil Registration No. |
| Date | An entered date. |
| Field | The value in a selected field. |
| Gender | Either “Female” or “Male”. Used only for comparing with gender from Civil Registration Numbers. |
| Person no. (age) (SE) | The person’s age (whole years) from a field with a Swedish Civil Registration Number. |
| Person no. (gender) (SE) | The person’s gender from a field with a Swedish Civil Registration Number. |
| Number | An entered number. |
| Text | An entered text. |
| Operator | Explanation |
|---|---|
| = | Parameter 1 equals Parameter 2. |
| <> | Parameter 1 differs from Parameter 2. |
| < | Parameter 1 is less than Parameter 2. |
| > | Parameter 1 is greater than Parameter 2. |
Calculation
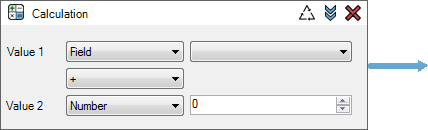
Figure 144
A calculation link carries out a simple mathematical calculation and gives a result which can be processed further in a subsequent link.
The calculation link is set up by selecting two values and an operator. Below, you find a list of all the possible values and operators, including a short explanation:
| Value | Explanation |
|---|---|
| Birth no. (age) (NO) | The person’s age (whole years) from a field with a Norwegian Civil Registration No. |
| Calculation result | The result from the most recent calculation link (only in Value 1). |
| Cpr.no. (age) | The person’s age (whole years) from a field with a Danish Civil Registration No. |
| Days | A number of days entered (calendar days or business days) which are to be added or subtracted from a date (only in Value 2). See 3.9.2.5. Holidays.xml for further information. |
| Field | The value in a selected field. |
| Person no. (age) (SE) | The person’s age (whole years) from a field with a Swedish Civil Registration No. |
| Number | An entered number. |
| Operator | Explanation |
|---|---|
| + | Value 1 plus Value 2. |
| - | Value 1 minus Value 2. |
| * | Value 1 times Value 2. |
| / | Value 1 divided by Value 2. |
Result
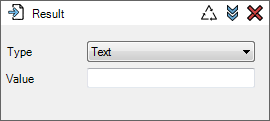
Figure 145
A rule chain always ends in a result link which inserts a result in the document.
To set up the link, choose the preferred result type and then enter or point out the content to be entered.
Below, you find a list of all possible result types, including a short explanation:
| Result type | Explanation |
|---|---|
| Calculation result | The result from the most recent calculation link. Format with or without thousands separator and number of decimals can be specified, which will ignore previous specified formatting. |
| Field | The value in a selected field. |
| Standard Content | A selected Standard Content. |
| Text | An entered text. |
3.9.2.2. Variables
With a variable, the user is prompted for a value which will not appear in the generated document, but often it can be used on equal terms with the other normal fields.
A variable is created with the plus button, which generates the following dialog box:
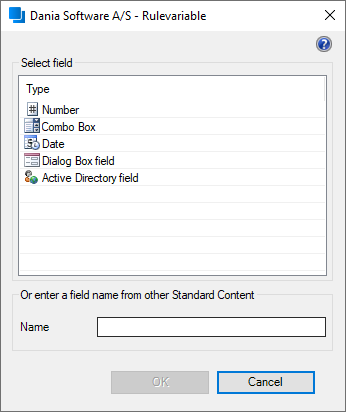
Figure 146
In the dialog box, you choose which type of Standard Content fields you want to set up as hidden fields. Then the field is named and set as usually. Please refer to the review of the various Standard Content fields elsewhere in the product description for help.
When the variables are set up, they are administered in ‘Variables’.
A variable is removed by using the cross button.
A variable is modified by using the edit button.
If a variable is no longer used in Standard Content when it is saved, users are prompted to choose whether to remove the variable.
3.9.2.3. Buttons
In the following section, you find a description of all the available buttons in the dialog box.
Link buttons
In all links, you find three buttons in the top right corner:

Figure 147
The left button is used for changing link type. When the button is enabled, the following dialog box appears:
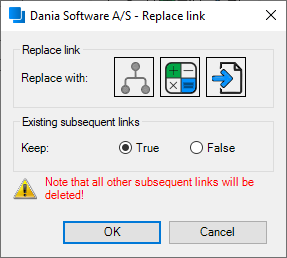
Figure 148
Here, you choose to which type the link should be changed and potentially what is going to happen with the subsequent links of the chain.
- If you change from If to Calculation link, it should be specified whether the link of the true or false connection should be preserved as a continuation of the chain. The rest of the connection links will be deleted.
- If you change from Calculation to If link, it should be specified whether the chain should be inserted on the true or false connection. The other connection will be empty.
- If you change to or from a result link, no choices should be made as the result link has never subsequent links and the existing links will therefore be deleted.
The middle button is used for changing the mode of the link between collapsed and expanded. A collapsed link cannot be edited but offers a quick overview of the content of the link.
The right button is used to delete the link from the rule. Please note that when a link is deleted, all the subsequent links will also be deleted. The Standard Content administrator must confirm the action before a link is deleted.
Other buttons
 Figure 149
Under ’Options’ you find two buttons to collapse and expand all links at the same time.
 Figure 150
Moreover, you find a setting called ’Scroll into View’ at the lower left-hand corner. When a new link is added while setting is enabled, the rule window will automatically move focus to the link’s position in the chain. If the options are deactivated, the actual focus will instead be stored.
3.9.2.4. Sources of Error
If a rule is not set up correctly or a link is missing, for instance, this will result in an error when the Standard Content is inserted:
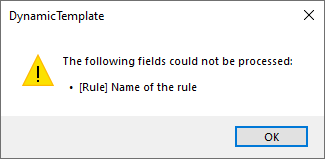
Figure 151
A defective rule will be stopped before insertion and will not prevent the other content of the Standard Content from being inserted. Typical sources of errors are that the rule is empty, that no result link has been inserted or that the calculation was not possible.
The rule does not impose limits on how the different links can be combined or which parameters and values that are to be tried compared or calculated. Therefore, it is up to the Standard Content administrator to ensure that the link content is logically valid so the rule does not try to multiply a date with a text string.
Finally, it is not advisable to let two rules have each other as a result even though it is possible to have this kind of construction. Due to the internal circular relation of the rules, you cannot be sure whether the inserted result will be right.
Note: Although it is also possible to use integration-specific fields with, for example, case data in rules, the following situations should be avoided:
- With mass mailings: A rule should not be based on a recipient field (Civil Registration Number, name, address, etc.), if the letter will be sent to multiple recipients. As the rule is only run once, all the recipients would receive the same – incorrect – result.
- With complex fields: In certain integrations, fields can contain complex data, such as whole tables, paragraphs or larger collections of data. The rule engine does not support handling these complex fields.
- With fields that are to be moved: Case data is first inserted when the document is saved back into the system. If an integration uses fields that are then moved, then the data will not be accessible to the rule when it is run immediately prior to the save operation.
3.9.2.5. Holidays.xml
The configuration file ’Holidays.xml’ forms the basis for calculations of business days in the value type ’Days’ in the calculation link. The file will be supplied with a default kit of holidays (weekends will automatically be deducted) but other days that need to be deducted must be added manually.
A holiday can be added by creating a ’Day’ element at a new line where all the elements below must be present:
- Name: The name of the holiday or the like must be described.
- Y: The year of the holiday.
- M: The month of the holiday.
- D: The day of the holiday.
An example of the file containing the above elements is found in Figure 152 below:
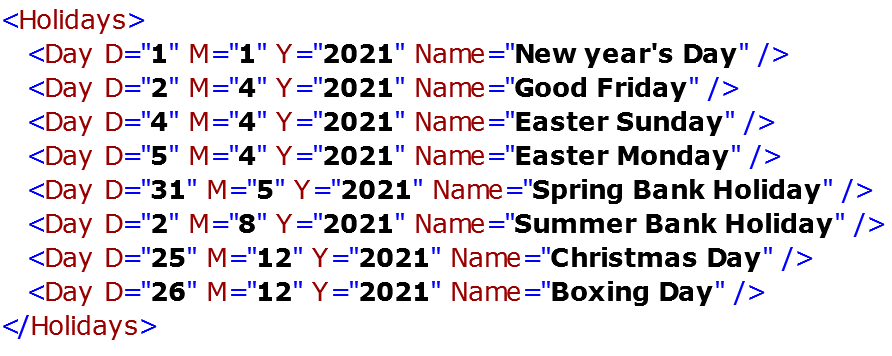
Figure 152
Was this article helpful?
That’s Great!
Thank you for your feedback
Sorry! We couldn't be helpful
Thank you for your feedback
Feedback sent
We appreciate your effort and will try to fix the article