3.1. DynamicTemplate system folders
The first step in setting up DynamicTemplate is creating the required system folders.
It is recommended that these folders are shared between DynamicTemplate users, and are created on a shared network drive. There are exceptions to this recommendation, discussed in the relevant sections below. Note that all folders are mandatory.
The folder names can be set as desired.
The system folders and associated contents are described below:
3.1.1. Main folder
A main folder must be created as the parent folder for the system folders used by DynamicTemplate.
Users of DynamicTemplate should be given read access but not write access to the folder, Standard Content administrators are an exception to this rule, see 2.2.3.2. Standard Content administrators, who should be given write access to the subfolder containing Standard Content, see section 3.1.3. Standard Content.
The system folders are described in the following sections.
3.1.2. Templates
A folder must be created for the Microsoft Office design templates. This can contain:
- Microsoft Office Word templates, formatted as ’.dot’, ’.dotx’ and ’.dotm’
- Microsoft Office Excel templates, formatted as ’.xlt’, ’.xltx’ and ’.xltm’
- Microsoft Office PowerPoint templates, formatted as ’.pot’, ’.potx’ and ’.potm’
- Microsoft Office Outlook templates, formatted as ’.oft’
Any design templates delivered with DynamicTemplate will be stored in this folder. The templates folder may also contain an unlimited number of subfolders for specific templates, so an appropriate organisation of templates can be achieved. However, it is not recommended that many templates are used.
These templates can include macros.
Note that macros are always active in templates accessed via DynamicTemplate. This is the case regardless of the security level associated with macros in Microsoft Office generally.
Users of DynamicTemplate should be given read access, but not write access to the template folder.
3.1.3. Standard Content
A folder must be created to contain the Standard Content library.
A Standard Content block is defined as a file that can contain plain or formatted text, tables, diagrams, images and graphical elements, together with any other form of content that can be used in Word documents or PowerPoint slides.
As a result, the Standard Content folder may contain these file types:
- Microsoft Office Word documents (RichBlocks): ’.doc’, ’.docx’ and ’.docm’
- Microsoft Office PowerPoint presentations (SlideBlocks): ’.ppt’, ’.pptx’ and ’.pptm’
- Text files (TextBlocks): ’.txt’
The Standard Content folder may also contain an unlimited number of subfolders for specific Standard Content, so an appropriate organisation of Standard Content can be achieved.
Users of DynamicTemplate should be given read access but not write access to the Standard Content folder. Standard Content administrators are an exception to this rule, see 2.2.3.2. Standard Content administrators.
3.1.4. Resources
A folder must be created for resources. This will contain the files used by DynamicTemplate e.g. images and text containing company details. These files may be of the following types:
- Images: ’.bmp’, ’.emf’, ’.eps’, ’.gif’, ’.jpeg’, ’.jpg’, '.png' and '.tif'
- Word documents: ’.doc’ and ’.docx’
- Text files: ‘.txt’
The setup of the image and text files in this folder is detailed in sections 3.4. Logo management and 3.5. Managing contact and opening hours.
Users of DynamicTemplate should be given read access but not write access to the resources folder.
3.1.5. Profiles
A profiles folder can optionally be created to contain user profile data.
Note that it is not necessary to create this folder. If no profiles folder is found, then it will be automatically created as described in section 3.1.9 Setup.xml.
It is recommended that the profile folder is not shared between users, as this can lead to conflicts between the profiles created. The best solution is to use a local folder or a folder on each user’s personal network drive.
Using personal network folders is recommended. This allows the IT department to back up the user profile folders and allows users to access their files regardless of which workstation they log into.
Users of DynamicTemplate must be given read and write access to their profile folder.
3.1.6. Signatures
A folder must be created to contain the scanned signature image files. The image files can be: ’.png’, ’.jpg’, ‘jpeg’, ’.gif’, ’.bmp’ and ’.tif’ The setup of the image files in this folder is detailed in section 3.7. Signature management . Users of DynamicTemplate should be given read access but not write access to the signatures folder.
3.1.7. Configuration
A folder must be created to contain the configuration files. Any configuration files delivered with DynamicTemplate will be stored in this folder. The following configuration files may be included:
- ActiveDirectoryDefinitions.xml
- ReceiverLookupConfig.xml
- Various EDRMS XML files
- Other customized XML files
Users of DynamicTemplate should be given read access but not write access to the configuration folder. Note that configuration files differentiate between upper- and lower-case letters in settings, elements and values.
3.1.7.1. Active Directory
From version 2.10.000 of DynamicTemplate it is possible to set up DynamicTemplate with Azure Active Directory (now Entra ID) to enable whether DynamicTemplate should read user information from a local Active Directory or from Azure Active Directory.
To use Azure Active Directory, consent must be granted on Dania Software’s Apps Portal (apps.daniasoftware.com) by an administrator account to allow DynamicTemplate to read in the Azure Active Directory, as described below.
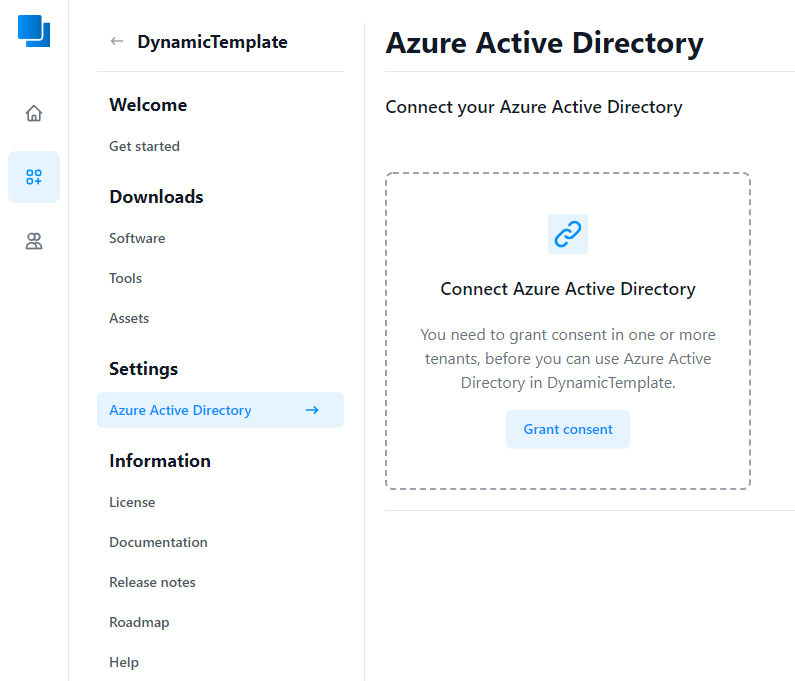
Figure 96
Here you can choose how much you want to give consent to. In order for the user to be able to choose other users than yourself, "Allow DynamicTemplate to read all users’ profiles’ must be selected.
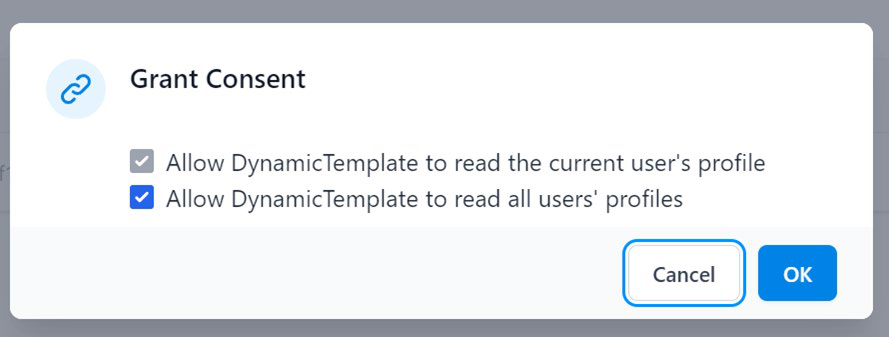
Figure 97
If consent is granted, your Azure Active Directory will be displayed in a table at the bottom of the page as illustrated below.
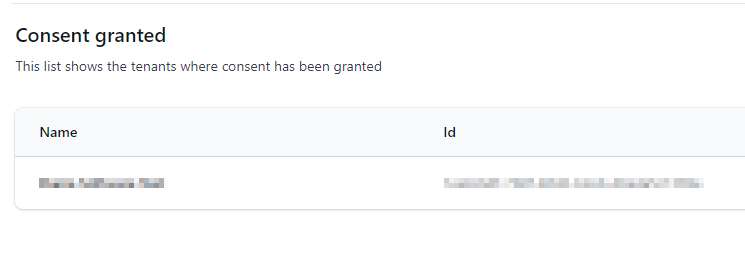
Figure 98
Subsequently, it is necessary to enable Azure Active Directory in DynamicTemplate in ‘Setup.xml’ under the node ‘ActiveDirectory’, as illustrated below.
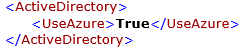
Figure 99
If set to ‘True’, DynamicTemplate will use Azure Active Directory instead of local Active Directory.
3.1.7.2. ActiveDirectoryDefinitions.xml
The file ‘ActiveDirectoryDefinitions.xml’ contains a list of user fields used by the local user profiles as well as by network profiles in DynamicTemplate.
Regardless of whether the solution is set up for a local Active Directory or Azure Active Directory, the same file must be used.
Details of these fields are used in various connections and contain following information:
- Field name
- Field name from AD (if the field is used by network profiles)
- Whether or not the field should be searchable in the dialog box when searching for users (as well as the sort order of the fields)
- Whether the field is a single-line or multiline field
- Whether the field should be read from an OU-element (if a local Active Directory is used)
A sample section of this file with above information is illustrated in Figure 100:
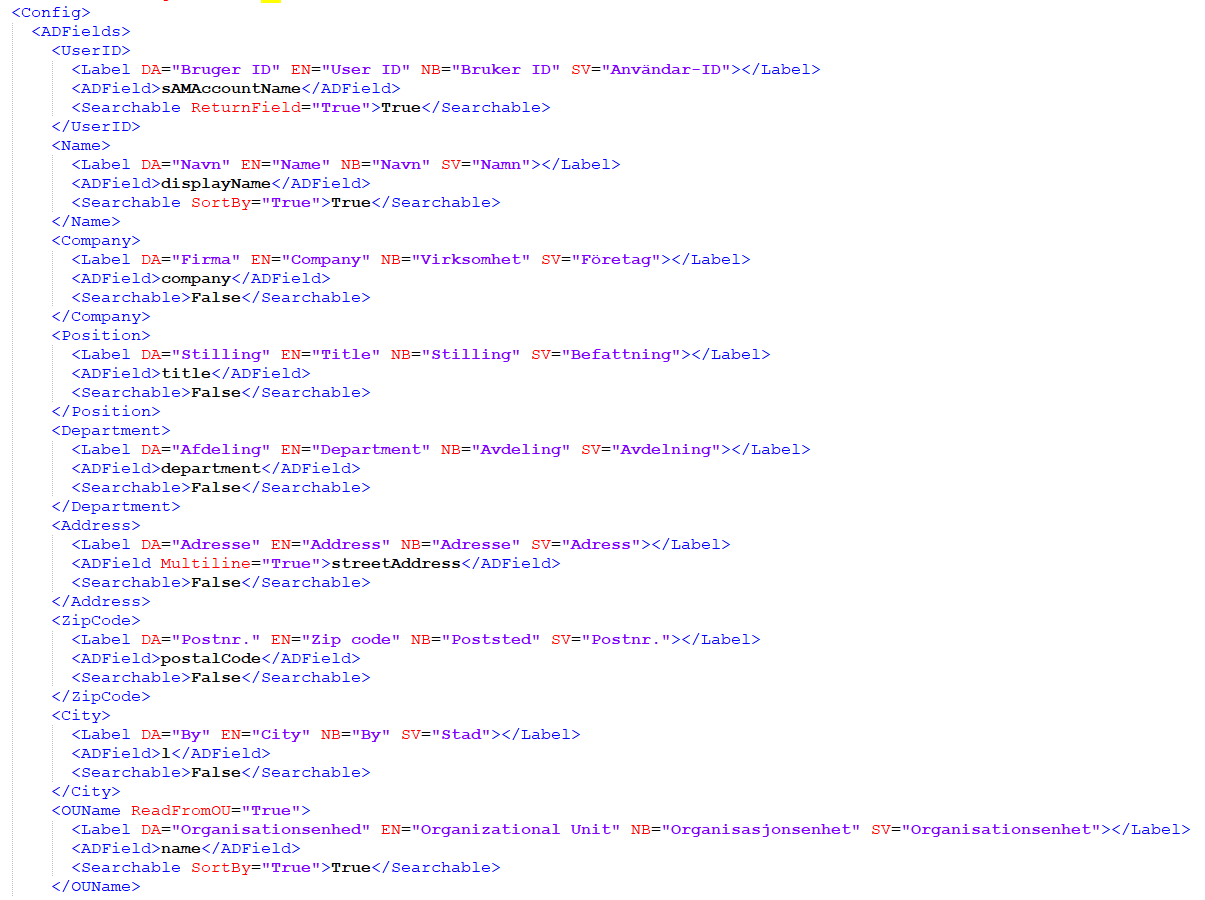
Figure 100
If you are using a local Active Directory, you can add the ‘ReadOU’ node. This must be set to 'true' in the fields that you want to read from the OU object, as illustrated in the section below.
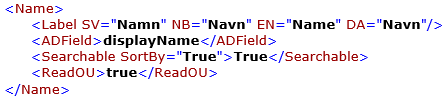
Figure 101
3.1.7.3. DialogFieldDefinitions.xml
‘DialogFieldDefinitions.xml’ details all of the template’s dialog box fields and makes it possible to insert content from these fields into a document using Standard Content fields (see 2.2.14. Dialog box field).
The file lists each dialog box field together with its associated settings, labels, and tags. A tag binds the dialog box field to one or more data fields from various sources.
These details are primarily used by the Standard Content field ‘Dialog Box field’, but if the customer’s template is set up for it, then the fields in the template’s own dialog box can also use them. This means that a template can quickly be set up to support future (or altered) data sources and systems, without requiring delivery of a new template from Omnidocs.
With a template that is structured in this way, it becomes possible for customers to modify the text on labels and buttons in their template dialog box. Note that fields containing sender details are still managed in the Active Directory definitions file (see 3.1.7.2. ActiveDirectoryDefinitions.xml).
To ensure that the correct tags are used, ‘DialogFieldDefinitions.xml’ must always be developed in conjunction with Omnidocs. The file simply enables customers to adjust the settings that are shown – a summary of available parameters is given below. Note that some elements only become relevant after a template restructuring:
- DialogField: Base element for a given field. May contain the attributes Name, Multiline and HideInStandardContent:
- Name: Unique field name. After template restructuring, name corresponds to a specific field name in a given template dialog box. Defined by Omnidocs.
- Multiline [optional]: If set to ‘True’, the resulting textbox will be able to contain more than one line of text.
- HideInStandardContent [optional]: If set to ‘True’, then the field will not be included in the menu ‘Dialog Box field’ when the Standard Content is inserted.
- Tags: Tags for lookup and insertion of field values in the template. Defined by Omnidocs.
- Label: The field’s title in the ‘Dialog Box field’ menu (language dependent). After template restructuring, this is also the field’s label in the dialog box unless an alternative is specified in TemplateLabel.
- TemplateLabel [optional – requires template restructuring]: If a different label is desired in the template’s dialog box than in the ‘Dialog Box field’ menu, enter the dialog box label here (language dependent).
Contact Omnidocs for information regarding restructuring your existing templates and for help setting up the configuration file.
The following example shows ‘DialogFieldDefinitions.xml’ using the elements described above:
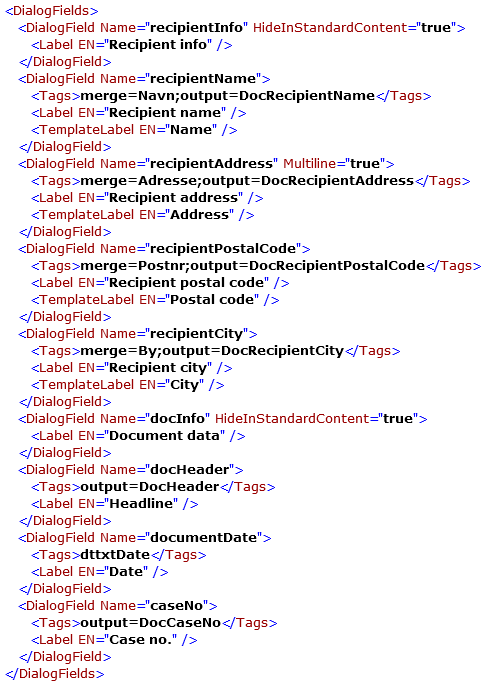
Figure 102
3.1.8. Joint user settings (CompanySettings)
A folder for configuration files with joint user settings may be created.
If the functionality is to be used, the folder must be created.
The XML configuration files containing the individual settings must be located in the folder.
The file name just has to match the content of the installation parameter ’CompanySettings’ which may be specified when the solution is installed as described under 3.2 DynamicTemplate installation.
Moreover, the path to the folder is placed in the element <CompanySettingsPath> in <LocationsOnline> in ’Setup.xml’ (see 3.1.9.1. System folder paths ).
3.1.8.1. Start folder
Configurations for joint favourites are set up with the following setup in the configuration file:
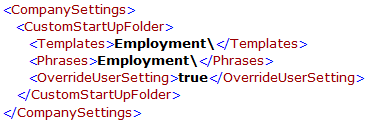
Figure 103
In the ’Templates’ and ’Phrases’ elements, the paths to templates and Standard Content may be specified. The path must be specified as a relative path in relation to the root of the Standard Content library.
In the ’OverrideUserSetting’ element, it should be specified whether the user should be able to overwrite the defined start folders by specifying the value ’true’ or ’false’. If ‘true’ is selected, the main start folder will always apply and the user will not be able to change this.
3.1.8.2. Favourites
Configurations for joint favourites are set up with the following setup in the configuration file:
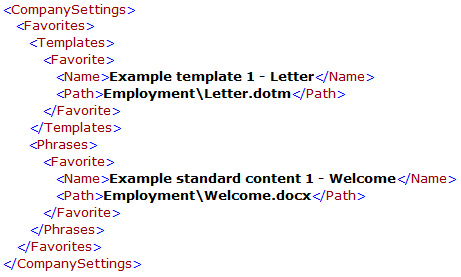
Figure 104
In the ’Templates’ and ’Phrases’ elements, the preferred settings for favourite templates and Standard Content may be specified.
The ’Favorite’ element represents a Standard Content file from which a random number may be set up under each of the above elements.
In the ’Name’ element, the name of the Standard Content which will be presented to the user is specified and in the ’Path’ element the path to the file is specified. The path must be specified as a relative path in relation to the root of the current content library.
3.1.9. Setup.xml
The main folder (described in 3.1.1. Main folder ) must contain Setup.xml, which is a file containing key information for DynamicTemplate. This includes:
- Paths to the system folders
- The name of the security group associated with Standard Content administrators
- Information for searching of resources
- Information of the number of available profiles from Active Directory
- Configuration of formatting dates in Standard Content
- Configuration of default settings for Standard Content fields
- Configuration of edit restrictions
This file is set up in cooperation with the client when the software is delivered by Omnidocs, but the relevant settings are briefly described in the following section.
3.1.9.1. System folder paths
Setup.xml includes a tag named LocationsOnline (under Setup) that contains the paths to the system folders.
This example shows part of a Setup file containing system folder paths:
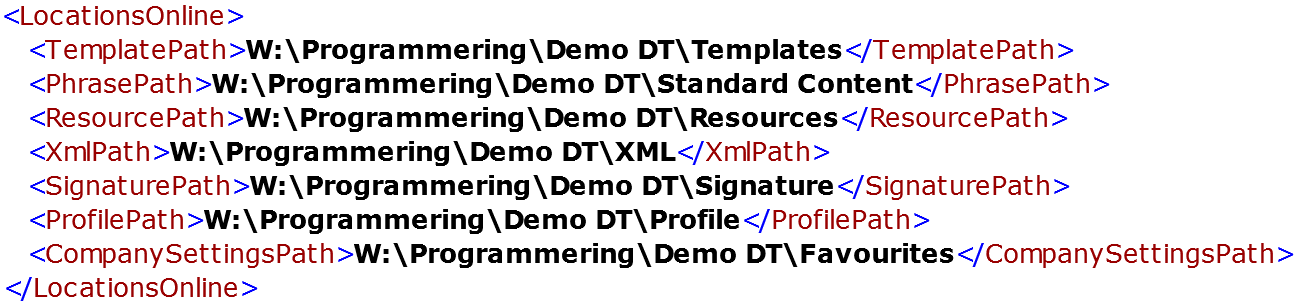
Figure 105
Note that the path tagged ProfilePath , uses the special variable %AppData% that converts to the following at runtime:
- Windows 7: C:\Users\<username>\AppData\Roaming\
ProfilePath is a special case, in that it is not required to exist in advance. If the profile folder is not found, then it will be created, so long as there is write access to that location.
In contrast to the example given, it is recommended that a personal network drive is allocated each user for the Profiles folder. This allows the IT department to back up the user profile folders and allows users to access their files regardless of which workstation they log into.
Like ProfilePath, AddonsPath is not required. However, the folder will not be created automatically if it does not exist.
Note that it is also possible to provide UNC paths in LocationsOnline.
3.1.9.2. Standard Content administrators
The Setup.xml file also contains a Security tag that defines the name of the security group associated with Standard Content administrators.
An example security group definition is shown below:

Figure 106
The term ’Standard Content administrators’ is explained in section 2.2.3.2. Standard Content administrators.
3.1.9.3. User Security Groups
It is possible to restrict which users have access to the solution and can see the DynamicTemplate tab in Office, based on one or multiple Active Directory or Azure Active Directory security groups. The permitted groups are specified in Setup -> Security -> UsersGroupName , separated by pipe symbols (‘|’).

Figure 107
3.1.9.4. Disable Tab Activation for Specified Groups
By default, the solution will automatically activate the DynamicTemplate tab in Office every time that new documents are created. This behaviour can be turned off for specific users, based on one or more security groups within Active Directory or Azure Active Directory. The groups where the DynamicTemplate tab shall not be activated should be listed in Setup -> Security -> DisableTabFocusGroupName , separated by a pipe symbol (‘|’)

Figure 108
3.1.9.5. Finding resources
A tag must be included in the Setup.xml file to point to the resources that are used in document templates. This is defined using Setup -> SpecialInfo -> ResourceTagPath.
The following example shows part of the Setup.xml file where the tag path is defined:

Figure 109
There is no limit to the number of items separated with ’/’, that can be entered within the resource tag path.
The items used in ResourceTagPath , must relate to the tags used in the configurations file ’ActiveDirectoryDefinitions.xml’ (see 3.1.7.2. ActiveDirectoryDefinitions.xml ) which is delivered with DynamicTemplate.
The functionality and uses of resources are described in sections 3.4. Logo management and 3.5. Managing contact and opening hours.
3.1.9.6. Displaying resource drop-down in user management
The dialog box for creating and editing local user profiles can be set to display drop-down lists for each field included in ResourceTagPath , see 3.1.9.5. Finding resources.
If there are multiple fields, then these are ordered according to the hierarchy detailed in ResourceTagPath – i.e., a value must be selected from the first field, before the next field can be used.
Drop-down list values reflect the file names in a directory created under the resource system directory: the first field’s (i.e., the first level in ResourceTagPath ) values are retrieved from the folders in the root of the resource directory. The next field’s values are retrieved from the relevant sub-directory, once a selection has been made.
Values can be entered into the drop-down lists that do not match these folder names, as it is possible to enter free text instead of choosing an existing value. There is no requirement for a folder to exist with the entered value as its name.
These drop-down lists can be activated by adding the element ShowResourceDropdown to the ’Setup.xml’ file as described below:

Figure 110
The values ’True’ and ’False’ indicate whether each function is turned on or off.
By default, all folders in the resource directory are shown in the drop-down list. Specific folders can be excluded from this list by listing them the element ResourceDropdownExcludes . Separate the folder names with the pipe symbol (’|’).

Figure 111
It is also possible to populate specified user details automatically when a given value is selected in the user profile. For example, a department specific web or email address can be added to the user profile relevant to the department selected from the drop-down list.
To enable this, an XML file containing the relevant details must be placed in the folder that has a name matching the selected value, and the element DropdownFieldValuesFilename must be added to ’Setup.xml’.
The XML file must contain one or more ‘ FieldValue’ elements, with their ‘ Name’ attributes set to match the field name to be populated, as written in ’ActiveDirectoryDefinitions.xml’. The text to be inserted should be entered as the element’s content.

Figure 112
The DropdownFieldValuesFilename element should then be added to ’Setup.xml’. DropdownFieldValuesFilename must include the name of the XML file. Note that all these XML files created in various subfolders must use the same file name.

Figure 113
3.1.9.7. Users from Active Directory
DynamicTemplate is normally designed in such a way that information from Active Directory can be used directly in the documents.
The user profiles that should be searchable from Active Directory are specified in the Setup.xml file in the tag Setup -> SpecialInfo -> ShowAllADProfiles:

Figure 114
There are two options for this setup:
- All users: The value of ‘ShowAllADProfiles’ is set to True
- Users of the same Organization Unit (OU) as the user himself: The value of ‘ShowAllADProfiles’ is set to False
Figure 114 illustrates how user profiles set up in the same OU as the user himself can be searched from the Active Directory. Note, that this setting is only valid if using a local Active Directory. The options for Active Directory are described in detail in section 3.1.7.1 Active Directory
3.1.9.8. Auto online
DynamicTemplate can be set to offline mode either manually or automatically in case of missing network (if the system folders are not available). DynamicTemplate is then capable of changing to online mode again upon restart of an Office program, if the system folders are available.
Whether DynamicTemplate should change to online mode automatically is managed by the ‘Setup.xml’ configuration file under the tag Setup -> SpecialInfo -> AutoOnline :

Figure 115
The setting is set up by specifying 'True' or 'False' in the element value. If 'True' is selected, the function will be enabled.
Note that users, who manually decide to work offline will be prompted to confirm that they want to change to online mode if the system folders become available. There will be no automatic change for these users.
3.1.9.9. Protected view
It is possible to get the solution to automatically deactivate the Word setting ‘Protected view’ which opens documents from the Internet or other external sources in a special mode where the document cannot be edited.
This could be relevant when using templates with a web-based position and is particularly relevant when using OneClick templates which are used from a web-based system.
The option is found in Word 2013 or newer versions.
Whether DynamicTemplate should deactivate this setting or not is managed in the ’Setup.xml’ configuration file under the Setup -> SpecialInfo -> DisableWordProtectedView element:

Figure 116
The setting is set up by specifying 'True' or 'False' in the element value. If 'True' is selected, the setting will be disabled.
3.1.9.10. Log Levels
It is possible to choose the level of detail included in the log files. Available levels are: ’Off’, ’Error’ (default setting), ’Warning’, ’Info’ and ’Verbose’. This is defined under Setup -> SpecialInfo -> LogLevel.

Figure 117
3.1.9.11. Tab placement
It is possible to configure the tab placement relative to the built-in Office tabs under Setup -> SpecialInfo -> TabInsertLocation item.

Figure 118
With the values ‘Before’/ ’After’, the ’Direction’ attribute specifies where to place the DynamicTemplate tab in relation to the specified built-in tab.
The attributes ’Excel’/ ’Outlook’/ ’PowerPoint’/ ’Word’ specify which built-in tab the DynamicTemplate tab should be inserted relative to in the Office application.
Valid values are determined by the respective Office application and are listed below.
| Excel | Outlook | PowerPoint | Word |
|---|---|---|---|
| TabHome | TabMail | TabHome | TabHome |
| TabInsert | TabCalendarTableView | TabInsert | TabInsert |
| TabPageLayoutExcel | TabCalendar | TabDesign | TabWordDesign |
| TabFormulas | TabContacts | TabTransitions | TabPageLayoutWord |
| TabData | TabTasks | TabAnimations | TabReferences |
| TabReview | TabNotes | TabSlideShow | TabMailings |
| TabView | TabJournals | TabReview | TabReviewWord |
| TabDeveloper | TabHomeGroup | TabView | TabView |
| TabAddIns | TabSendReceive | TabDeveloper | TabDeveloper |
| TabPrintPreview | TabFolder | TabAddIns | TabAddIns |
| TabBackgroundRemoval | TabView | TabPrintPreview | TabBlogPost |
| TabDeveloper | TabMerge | TabBlogInsert | |
| TabAddIns | TabGrayscale | TabPrintPreview | |
| TabBlackAndWhite | TabOutlining | ||
| TabBroadcastPresentation | TabConflicts | ||
| TabSlideMaster | TabBackgroundRemoval | ||
| TabHandoutMaster | TabBroadcastPresentation | ||
| TabNotesMaster | |||
| TabBackgroundRemoval | |||
| TabSlideMasterHome |
3.1.9.12. Resource files
The type of resource files to be included in a document can be set in the ‘Setup.xml’ configuration file, e.g. campaign files, files for contact and opening hours, etc. under the tag Setup -> ResourceDocumentTypes :
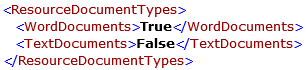
Figure 119
For each file type in the above element, you may choose whether it should be included in the finding of resources by specifying 'True' or 'False' in the respective element values. If 'True' is selected, the file type will be included in the finding.
It is possible to select Word documents and/or text documents ('.txt). If both file types are included, the first file found within both file types will be used.
3.1.9.13. Date format
When specifying which date formats, you want to insert in the DynamicTemplate Standard Content, the desired language and associated format are specified under the element Setup -> LanguageSettings :
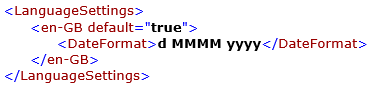
Figure 120
Under this element, you must have an additional element with the preferred language and here the desired format for the selected language is specified as illustrated above.
The desired language is specified as a combination of a language code and a country code separated by a hyphen. Language codes follow the standard 'ISO 639-1' (two letters) and country codes follow the standard 'ISO 3166' (two letters).
The desired format is specified as a format string based on Microsoft's specification of the relevant standards.
Below, you find an extract of possible values:
- d / dd Day specified as one or two digits (e.g. ’1’ or ’01’)
- M / MM Month specified as one or two digits (e.g. ’1’ or ’01’)
- MMM Month specified as short format text (e.g. ’Jan’)
- MMMM Month specified as long format text (e.g. ’January’)
- yy / yyyy Year specified as two or four digits (e.g. ’14’ or ’2014’)
You find a full list of possible specifications of format strings here: http://msdn.microsoft.com/en-us/library/8kb3ddd4(v=vs.100).aspx
Values which are not considered a specification of format will only be inserted as they are. This is for instance the case with the hyphen in the above extract.
Templates may be set up to be used in a specific language and it is therefore possible to configure several languages. If this is the case, the following default languages have to be specified by marking it with the attribute ’default=”true”’.
3.1.9.14. Configuration of default settings for Standard Content fields
It is possible to configure how the Standard Content fields should be set up and filled in when Standard Content containing Standard Content fields is inserted in a document.
Available settings are found under the Setup -> PhraseFieldSettings:
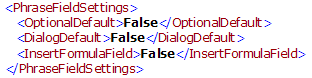
Figure 121
The ‘OptionalDefault’ element indicates whether the ‘Optional’ setting should be marked by default when Standard Content fields supporting the setting are inserted in Standard Content. The element may take on the value “True” which indicates that the field is marked by default or “False” which indicates the opposite.
The ‘DialogDefault’ element indicates whether the ‘Excluded from Standard Content dialog box’ setting should be marked by default when Standard Content fields supporting the setting are inserted in Standard Content. The element can take on the value “True” which indicates that the field is marked by default or “False” which indicates the opposite.
The ‘InsertFormulaField” indicates whether a formula field should be inserted as a replacement of the value in situations where a value has not been indicated in connection with an optional Standard Content field. The element may take on the value “True” which indicates that a formula field is inserted or “False” which indicates that nothing is inserted.
3.1.9.15. Configuration of edit restrictions
It is possible to configure how documents are edit restricted when Standard Content containing formula fields is inserted.
Edit restriction is managed under the Setup -> ProtectDocument :

Figure 122
This element may take on one of the following values: “On”, “Off” or “Prompt”.
The value “On” indicates that the documents are automatically edit restricted.
The value “Off” indicates that the documents are not edit restricted.
The value “Prompt” indicates that the user will be prompted for whether the document is to be edit restricted.
3.1.9.16. Settings for Templates and Standard Content search
The ’Standard Content’ window has a search function for Standard Content and folders in the Standard Content library (see 2.2.2.3. Standard Content search).
The ‘Templates’ window has a corresponding search function for templates and folders in the template library (see 2.1.1 Templates).
By default, the search results are displayed as soon as a few characters have been entered in the search box. However, the behaviour can be adjusted so that search is not performed until the user clicks Enter or the icon on the right-hand side of the search box:
 Figure 123
The setting is changed in ‘Setup.xml’ in the element Setup -> SearchSettings -> DisableTypeAhead :

Figure 124
If the setting is omitted or ’False’ is selected, the search results are displayed immediately. If the value ‘True’ is selected, users must start the search themselves.
3.1.9.17. Using add-on templates
When entering a valid path in ‘AddonsPath’ in Setup.xml (see section 3.1.9. Setup.xml ), you can choose to place one or more templates containing macros (.dotm format) that will be universally accessible to users in Word.
Such templates might include, for example, extra menu bars or other Word functionality. When Word starts, it automatically adds the templates it finds as add-ons in Word.
3.1.10. System.cfg
‘System.cfg’ is the DynamicTemplate license file.
This file must be placed in the main folder described in section 3.1.1. Main folder . The file is encrypted and can only be edited by Omnidocs.
Was this article helpful?
That’s Great!
Thank you for your feedback
Sorry! We couldn't be helpful
Thank you for your feedback
Feedback sent
We appreciate your effort and will try to fix the article