We support specific ribbon configuration, but notice that it is rarely necessary to change the default configuration of the ribbons that are applied when Alloy structure is created or updated. It is therefore also important to be aware of SDUP's with specific ribbon configuration when updating Alloy as this can overwrite the customized configuration.
There are three main .xml files for ribbon configuration which are located in the following path within a client's SDUP:
...\files\ProgramData\OfficeExtensions\Common\Configuration
Furthermore, there is a folder with ribbon templates for Outlook. These should not be edited. Read more about setting the Outlook ribbon later in this article.
For the following configurations different idMso's are used. Lists of the different available idMso's can be downloaded on this web page.
Ribbon template
The RibbonTemplate.xml is where we define the different ribbons. As default, this will consist of a contextual chart ribbon, the ribbon for our solution, the home tab and the developer tab. If a solution requires an extra ribbon, this is where we configure it. Here is an example from SD.Demo:
<tab idQ="sd:Charts" label="CorporateCharts" insertAfterMso="TabHome" visible="true">
    <group idQ="sd:ONEcharts" label="GroupLabel" visible="false"/>
</tab>
<tab idQ="sd:Tables" label="CorporateTables" insertAfterQ="sd:Charts" visible="true">
    <group idQ="sd:ONEtables" label="GroupLabel" visible="false"/>
</tab>
<tab idQ="sd:Essential" label="EssentialTools" insertAfterQ="sd:Tables" visible="true">
    <group idQ="sd:ONEessential" label="GroupLabel" visible="false"/>
</tab>
This is the configuration of three separate ribbons (three tabs). Firstly, we define an idQ for the ribbon, and this must be unique. We also define the label of the ribbon. This is the name of the tab in Office. We are also able to specify where the tab should be positioned according to the other tabs, either other customized tabs or the native tabs. Use either insertBeforeQ or insertAfterQ if it is a customized tab and either insertBeforeMso or insertAfterMso if it is a native tab.
Contextual tab
We can create custom ribbon tabs based on contextuality. In below example, we create a custom tab for table context.
<tabSet idMso="TabSetTableTools" >
  <tab id="MyContextualTab" label="My Contextual Tab">
    <group id="GroupTableFormatting" label="Table formatting"/>
  </tab>
</tabSet>
Ribbon config
The RibbonConfig.xml is rarely to be edited, but here we define the ribbon configuration for Word, PowerPoint, Excel and Outlook.
Ribbon show map
In RibbonShowMap.xml we define a variable for each tab. This variable is the one we use when naming folders in the Modules folder, instead of writing nocontext which is default. Read more about how to name module folders in this article.
Here is an example that matches the excerpt from the ribbon template above:
<charts>
    <tab idQ="ONEcharts"/>
</charts>
<tables>
    <tab idQ="ONEtables"/>
</tables>
<essential>
    <tab idQ="ONEessential"/>
</essential>
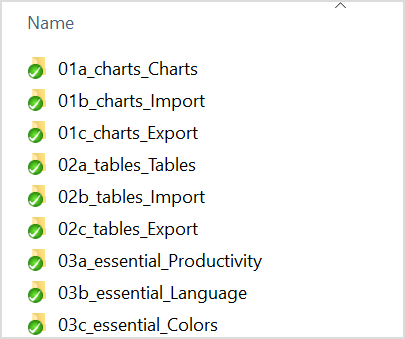
Here, we refer to a specific tab (idQ) from the RibbonTemplate.xml within a variable that is then used in the Module folder:
Outlook ribbon
It requires specific ribbon configuration when features should be present in Outlook. We have prepared the default Alloy with some of these ribbon configurations, so instead of using the regular nocontext when naming your module folders, you can replace it with the options below in order to target different ribbons in Outlook.
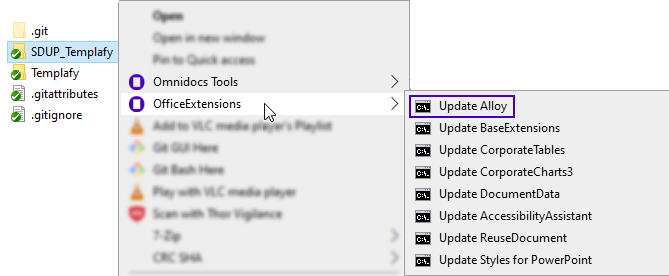
NB. Make sure to update Alloy with the latest version in order to use the properties below. Right-click the SDUP concerned and select the following option to update Alloy:
"Home" tab
If you have any buttons or menus that should be present in the "Home" tab in Outlook, use mailexplorer. The "Home" tab is the default explorer window in Outlook.
Example of the naming of the module folder:
01_mailexplorer_OmniTools
"Message" tab
In order to target the "Message" tab, it is important to use both composecontextual and composeexplorer to ensure that the buttons or menus are present both when writing a new email and when replying an email.
composecontextual targets the mail compose in the separate window, e.g. when clicking "New Email" or when replying an email in pop out view.
composeexplorer targets the mail compose in the explorer view, which is the contextual ribbon when writing an email, e.g. when replying an email that is not in the pop out view.
Examples of the naming of the module folders:
02a_composecontextual_OmniTools
02b_composeexplorer_OmniTools
"Appointment" tab
In the calendar view in Outlook, we can add buttons or menus to the "Appointment" tab. Use appointment to target the tab, and this will apply for both when creating a new appointment and when editing an existing appointment.
Example of the naming of the module folder:
03_appointment_OmniTools
Contextual calendar menu
The contextual calendar menu is the list of options when you right-click at an existing appointment in your Outlook calendar. We can add buttons or menus to this list by using calendar.
Example of the naming of the module folder:
04_calendar_OmniTools
Developer ribbon
Sometimes it can be handy to place features in the Developer tab instead of the main ribbon.
We have prepared the default Alloy with ribbon configuration that enables to replace nocontext in the folder name of modules with developer, and thus the particular module will be present in the Developer tab instead of the regular ribbon.
Here is an example:
99_development_Admin
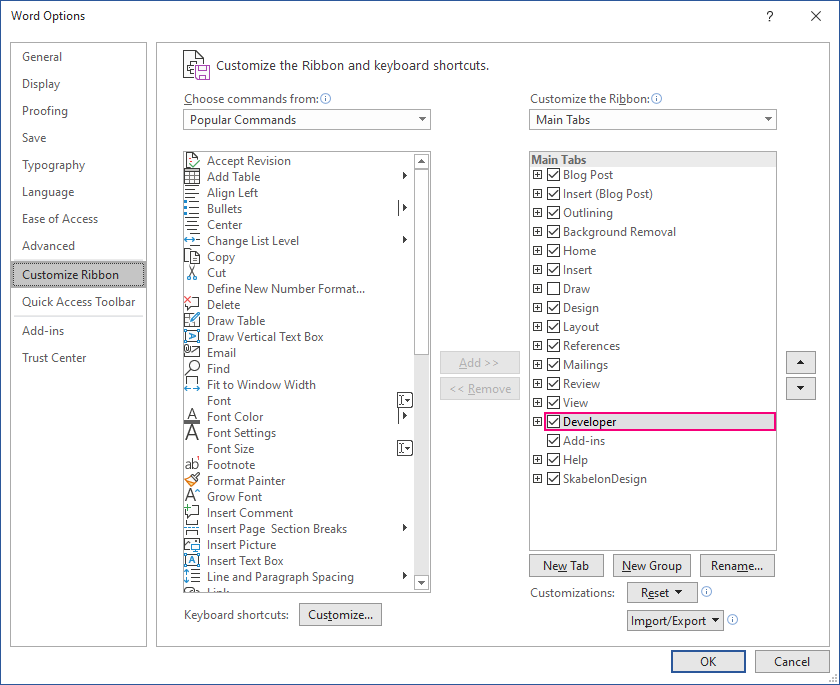
Remember to ensure that the Developer tab is activated in File -> Options -> Customize Ribbon:
Right-click menus and buttons
It is also possible to create right-click menus and buttons like this:
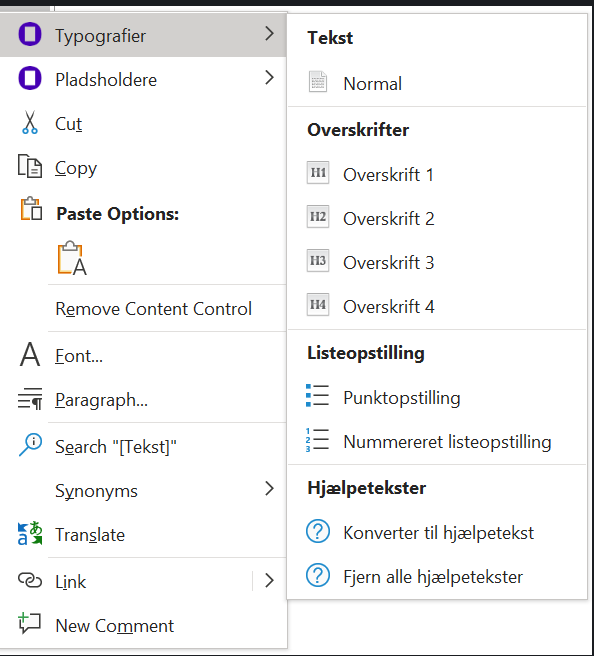
However, this functionality is not enabled in the ribbon configuration by default. In order to enable this, three things has to happen.
- Edit the RibbonShowMap.xml
- Edit the RibbonTemplate.xml
- Create folder in the modules named 01_TextContextMenu_test ("01" and "test" is optional).
Note that when updating Alloy in a SDUP, custom ribbon configuration will be overwritten. For this reason, we need to make sure that these files are not updated by reverting these files after the update.
1. Edit RibbonShowMap.xml
Add the following to your RibbonShowMap.xml inside the <Show> tag.
<TextContextMenu>
     <contextMenu idMso="ContextMenuText"/>
     <contextMenu idMso="ContextMenuHeading"/>
     <contextMenu idMso="ContextMenuFieldDisplay"/>
     <contextMenu idMso="ContextMenuTableCell"/>
     <contextMenu idMso="ContextMenuTextTable"/>
     <contextMenu idMso="ContextMenuHeadingTable"/>
</TextContextMenu>
2. Edit RibbonTemplate.xml
Add the following to you RibbonTemplate.xml inside the <V> tag and replace any similar named tags:
<contextMenus>
     <contextMenu idMso="ContextMenuChartArea">
     </contextMenu>
     <contextMenu idMso="ContextMenuCell">
     </contextMenu>
     <contextMenu idMso="ContextMenuShape">
     </contextMenu>
     <contextMenu idMso="ContextMenuChartPlotArea">
     </contextMenu>
     <contextMenu idMso="ContextMenuChartGridlines">
     </contextMenu>

     <contextMenu idMso="ContextMenuText">
     </contextMenu>
     <contextMenu idMso="ContextMenuHeading">
     </contextMenu>
     <contextMenu idMso="ContextMenuFieldDisplay">
     </contextMenu>
     <contextMenu idMso="ContextMenuTableCell">
     </contextMenu>
     <contextMenu idMso="ContextMenuTextTable">
     </contextMenu>

     <contextMenu idMso="ContextMenuHeaderArea">
     </contextMenu>
     <contextMenu idMso="ContextMenuFooterArea">
     </contextMenu>

     <contextMenu idMso="ContextMenuTableWhole">
     </contextMenu>
     <contextMenu idMso="ContextMenuTable">
     </contextMenu>
</contextMenus>
3. Name your module folder correctly
In order to target the right-click context menu, replace nocontext in the name of the module folder with TextContextMenu. Here is an example:
01_TextContextMenu_Test
Locate the modules that should be in the right-click context menu inside this folder.
Different ribbon location
We support pointing to a different Alloy ribbon configuration, and thus it is possible to have an alternative location for RibbonTemplate.xml or the RibbonTemplate.Outlook folder.
In the SOFTWARE\SkabelonDesign\Global registry, we can add a new parameter called RibbonPath and the value for that should be the path to the folder where it should look for the above-mentioned files.
Here is an example:
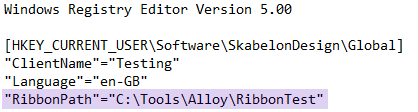
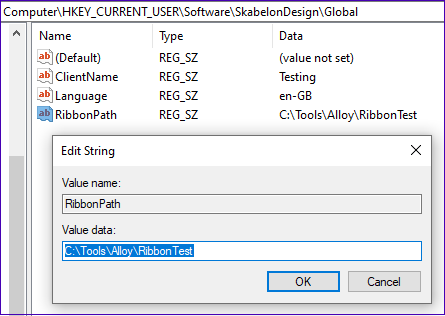
In this case, it will look for the RibbonTemplate.xml file or RibbonTemplate.Outlook folder in a folder called RibbonTest.
The RibbonConfig.xml and RibbonShowMap.xml stay in the config of Alloy.
Was this article helpful?
That’s Great!
Thank you for your feedback
Sorry! We couldn't be helpful
Thank you for your feedback
Feedback sent
We appreciate your effort and will try to fix the article